

Faberge Easter Egg
Easy step by step instructions showing how to make your own mock Faberge Easter egg, presented by Crafty Corner
For any questions contact us via email
This is quite a simple project showing you how to decorate a plain ceramic oval shape to create an exquisite mock Faberge Easter egg, a great decoration for Easter.
Follow our easy step by step instructions to see how to make your own Faberge Easter egg!

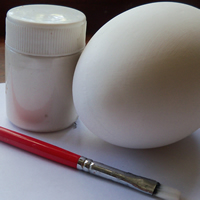
What you need to make a Faberge Easter egg:
- Ceramic (unglazed) egg shape
- Diamante embellishments (we ussed gold & red)
- Cord (we used gold to match our diamante)
- Jewel glue
- Toothpick
- Pearl paint
- Paint brush (medium size)
- Bucket / tub with sand
- A stick or dowel stick
- Working surface
- Old tile
Jewel glue can take quite some time to dry properly. You may need to work on one side of the faberge egg first and then wait for the glue to dry before turning it over and working on the other side. It's always better to work slowly and with more care than to try and rush to complete the project.
Step 1
Gather the ceramic egg shape, pearl paint and brush to your work surface.
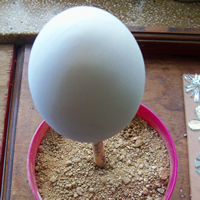
Step 2
Your ceramic egg should have a hole in the bottom end. Use your stick/dowel stick to prop the egg up in your bucket of sand for the painting part of this project.
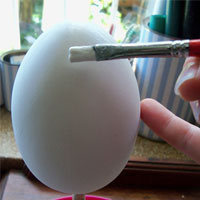
Step 3
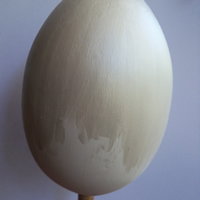
Apply even and smooth strokes of pearl paint with your brush to the ceramic egg shape. You will need more than one layer of paint, so repeat this process, waiting for each layer to dry properly in between coats.
It is better to rather keep the paint thin and light, and then increase the number of layers to obtain a more solid coating.
Step 4
Now we can start decorating the ceramic Easter Egg!
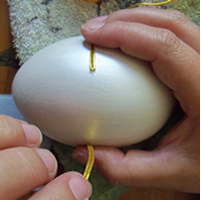
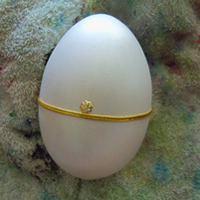
Measure and cut a length of gold cord which will fit around the widest point of the circumference of the egg.
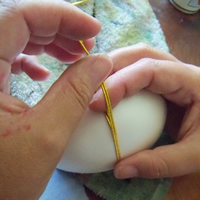
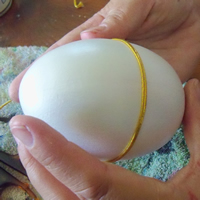
Step 5
Now squeeze out a line of jewel glue at the widest part of the egg, and carefully wrap the cord around. Work slowly to make sure the cord runs straight and is centred on the ceramic egg.
Step 6
Rest the egg shape on the towel to prevent it rolling around. You can also use the towel to prop the egg up slightly, making it easier to work on.
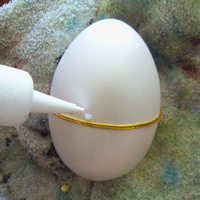
Step 7
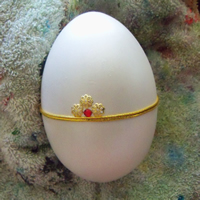
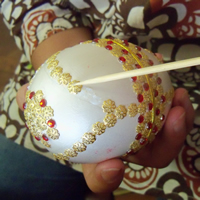
Squeeze a small blob of jewel glue just above the gold cord, and then place a gold diamante onto the glue, pressing it gently into place. If the diamante shifts out of place, use a toothpick to help push it where you want it to stick.
Step 8
Place another blob of jewel glue next to the first gold diamante and place a red embellishment there. Then continue with another gold diamante next to the red embellishment. We have also used jewel glue to glue a gold diamante above the red embellishment.
Step 9
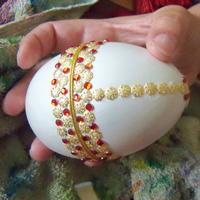
Once you have completed your double line of embellishments above the gold cord, do the same just below the gold cord, repeating steps 7 & 8.
Step 10
With double lines of embellishments above and below the gold cord, now glue a line of gold embellishments going up to the top of the egg. remember to use the toothpick to move the embellishments should they shift out of place.
Step 11
At the top of the egg we added a few red embellishments. You can see from the pattern we have created, that you now need to glue another two lines of gold diamantes that run vertically to the top of the egg.
Step 12
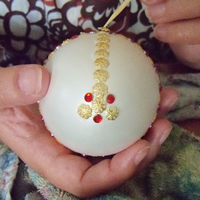
With the three vertical lines done, we created a small flower pattern in the open areas.
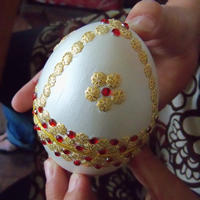
Step 13
At the bottom of the faberge easter egg, we created a small pattern of gold and red embellishments. Then we created running curves that would match up to the vertical lines on the top half of our egg.
Step 14
Gently rest the faberge egg on the towel and leave until the jewel glue is completely dry.
Step 15
Once completely dry, spray the Faberge egg with a clear coat to add shine and a nice polished finish. If you need to, first spray the one side of the egg and allow to dry before rolling over to complete the reverse side.
Step 15
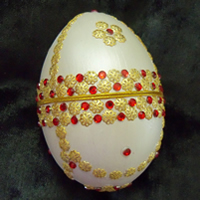
Your Faberge Easter egg is now complete and ready to add some sparkle to your Easter celebrations!