
Step by step on how to decorate a wooden money box using glass paint, presented by: DALA
For any questions contact us via email

Proudly sponsored by Dala

What you need to make a glass painted money box:
- Dala Glass Glaze
- Dala Glass Artliners
- Raw wooden money box (obtainable from decoupage craft shops)
- Beads, charms, buttons of your choice
- Dala Craft Glue Pen
- Picture or design of your choice
- Small paint brush with plastic handle
- Paper towel
- Ear buds
- Pencil or carbon paper
Method
Children can help choose the design or picture for their money box and can help fill in the colour once the outline has been drawn by their mother. The final touches of buttons, beads & charms can be selected by the child. Children can glue these on once the money box has been completed. The Dala Craft Glue Pen is extremely child-friendly to use.
Step 1
Choose a design or picture and softly draw it on with pencil on one side of the money box. Carbon paper and a sharp object could also be used to transfer the design onto the wooden decoupage box.
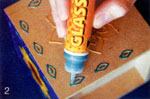
Step 2
Using Dala Glass Artliners, draw the outline of the design using different colors. Choose a neutral colour and outline the sides of the box so that the background colour does not run over the sides.
Step 3
Allow to dry for an hour.
Step 4
Using the back of a paint brush, colour in the design with Dala Glass Glaze. Work from the outline inwards towards the centre of each section. Apply Glass Glaze liberally but take care not to allow colours to run over outline into next section.

Step 5
Apply Glass Glaze to the background, filling in all the uncovered areas.

Step 6
Allow to dry completely before beginning on another side of the box.
Step 7
Follow the above steps for each side, repeating the same design or using a different design for each new side. Once all the sides have been painted, use the Dala Craft Glue Pen to stick beads, buttons or charms of your choice onto your Crafty Money Box.
Tip
When using Dala’s Glass Artliners, maintain even pressure when drawing outlines and hold the Artliner at a 45˚ angle at all times in order to have the nozzle in full view. It is recommended to draw away from your body and not towards your body.
Presented by DALA’S: Wendy Hindle