Mosaic Daisy Mirror
Step by step instructions showing how to make your own mosaic daisy mirror, presented by Crafty Corner
For any questions contact us via email
There are so many great mosaic ideas if we just use a little creativity and think out the box. With this mosaic project we cut long oval bits of mirror to create a beautiful mosaic daisy mirror.

What materials you need to make a mosaic daisy mirror:
- Masonite mosaic board, approx. 450mm x 600mm
- Mirror strips, preferably long strips approx. 100mm width for the petals
- Large mirror strip, for the centre
- Glass nuggets (we used orange)
- Glass tile cutter
- Wood glue
- Tile grout
- Pliers
- Plumbing pliers
- Water
- Mixing tub
- Hard foam or old credit card to use as grout applicator
- Ice cream stick
- Sponge or cloth
- Old dry towel or cloth
Step 1
In order to create a beautiful Daisy Mirror mosaic, we need to start by cutting out the petal shaped mirror pieces.
Do this by marking out the petal shapes with a permanent parker (for a guide line), and then using your glass tile cutter to trace along these lines. Keep the cutter upright and press firmly when doing so, making sure you can hear a scratching sound, otherwise the glass will not cut.
TIP: Keep the blade of your glass cutter well oiled to prevent the glass cutter from going blunt. You can use ordinary motor oil for this, or any machine oil, such as sewing machine oil.

Step 2
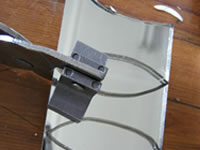
Now we can start breaking the petal shapes free from the mirror strips. If you have tile breakers, you can use these first to crack along the scratch line. Then use your plumber's pliers. Plumber's pliers are rounded, when they are closed the centre is open and it only grips at the nose of the pliers. These are great, as you can grip where you would like to break the mirror without crushing the edges of your mirror and they chip the tiles far less than regular pliers.
With a firm hand, grip the mirror just where the crack is, and then use a quick motion to snap the mirror.

Step 3
Keep the between sections of mirror, that are left behind after the petals – these will be used later.

Step 4
We need to mark out the section which should be left blank, for the larger solid piece of mirror, which is the centre of the board on this project. You can place this solid section of mirror down on the board, and then use your marker to create an outline around it. Remove the solid section and we will place it later.
Step 5
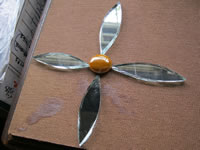
With our petals ready, we can start placing the design onto the masonite board. We have used orange glass decor nuggets for the centre piece of each flower. Place a small amount of glue onto the board and press the nugget down into position.

Step 6
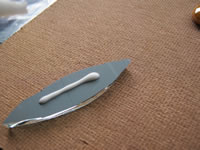
Petal sections can now be arranged around the centre piece. Place a small line of glue onto the back of a petal and stick down in the 12 o' clock position. Then stick further petal sections down onto the board at the 3, 6 and 9 o' clock positions. This ensures that the petals are running straight and will be evenly spaced. This is very important for a pleasing final product.
Step 7
Continue by sticking further petals down, to fill up the flower.


Step 8
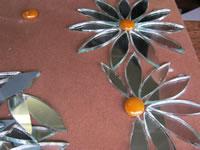
With the first daisy down on the board, you can continue these steps and add more, either in a random pattern or more structured – this is up to you! Your daisy flowers can be tightly packed or spaced out. Be creative and follow your own mosaic ideas if you like!
Step 9
We have a random, free flowing layout – so you will see that we have a daisy or two which have petals extending over the masonite board's edge. You will need to use a white board marker to draw a line on the mirror petal, along the masonite mosaic board edge and then use the two wheel tile cutter to cut off the bit you don't need.

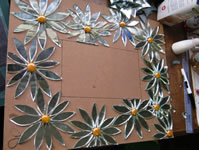
Step 10
Once you are happy with the quantity of your daisy flowers on the masonite mosaic board – we can start filling up the spaces in between.
Remember the 'in between' bits of mirror from Steps 2 & 3? These need to be broken up further, to create very small sections of mirror that will be used to occupy the spaces between your daisy flowers. Use your two wheel tile cutter to chip these into random shaped small pieces.


Step 11
Start on one side of the masonite mosaic board and work your way across. Start by putting some glue onto a section of the board and pressing the smaller bits of mirror in to fill the gaps as you would any other mosaic project.

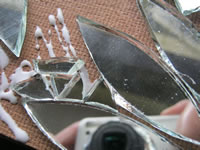
Step 12
When you apply glue to a section you want to fill, make sure not to cover an area that you can't fill before the glue dries, otherwise you will need to apply more glue on top of that and this will lead to an uneven finish. Rather work in small sections, slowly working your way around the mosaic board until you have filled up the entire board, apart from the centre where our mirror will go.


Step 13
We will now place glue on the mosaic board in the middle section for the solid section of mirror. Place the solid piece down on your mosaic board and press down. If you can see any small gaps around the solid piece and the mosaic work, fill these in with the smaller bits of mirror.
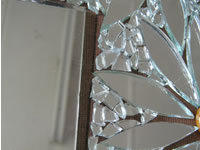
Step 14
Allow the glue some time to dry before mixing the tile grout. We have decided to use white grout as it reflects off the mirror very nicely.
Step 15
Once the glue is dry, it is time to mix the grout. Grout goes from being too thick to being too runny very quickly, so rather work with a little extra care and add a little water to the grout bit by bit, mixing each time to see if you have reached the right consistency.
The right consistency for mosaic tile grout is that of a very thin toothpaste, or mayonnaise. Make sure you have crushed any lumps and scraped the sides of the container.
Step 16
Once the grout is mixed, dump it onto your mosaic daisy mirror. Then use a hard sponge, old credit card, or something similar to work the grout around your mosaic. It is a bit like spreading butter on toast, make sure to cover the entire surface of your mosaic. Make an effort to work the grout into all the cracks and spaces between the mosaic bits, and also try to cover the edges of the masonite board to protect it from the elements.


Step 17
Leave the grout to dry for a couple of hours, and then gently wipe with a damp cloth or sponge. Leave overnight.

Step 18
Once your grout has completely dried, use a dry cloth to buff the surface and make your daisy mosaic mirror shine!


