Easy step by step instructions showing how to make your own mosaic incense burner, presented by Crafty Corner
For any questions contact us via email
There are so many great mosaic designs, ideas and projects one can up with. With this mosaic project, we drilled some holes into a board and decorated it with mosaic designs to come up with a beautiful mosaic incense burner.
What you need to make a mosaic incense burner:
- Pre-cut out incense burner board, available from Crafty Corner, or,
a) Square 200mm thick superwood board
b) Drill for making holes and indentations for the incense pyramids
c) Jig Saw for cutting out your holes - Pencil
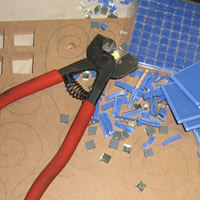
- Two wheel tile nipper
- Two or three colour mosaic tiles, glass or ceramic
- PVA glue (wood glue)
- Grout
- Grout scraper
- Water
- Mixing bowl and spoon
- Sponge
- Old dry towel
- Container with water for cleaning sponge
Read through all the instructions first before starting this craft.
Step 1
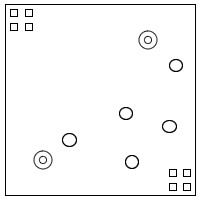
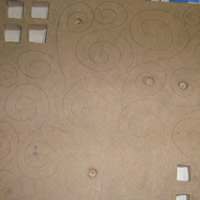
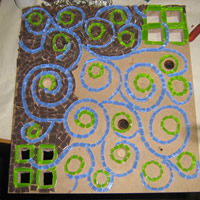
Plan where you would like your incense sticks, pyramids and where the candle will stand. Cut out the holes you need for the packets of incense to stand in, and drill little wells where the pyramids will fit into when burning.
On the following diagram, I have designated the squares to be the places where the incense boxes will fit into. The circles are where I have made indentations for incense pyramids and the double holes are for the incense stick holders to fit in. The open area is where the candles will stand.
Step 2
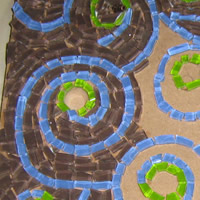
Now that you have cut out and drilled your holes and indentations, draw a mosaic design on the rest of the incense burner. I have just chosen to go with a basic swirl mosaic design, and in the middle of some of my swirls I will put some of the indentations for the pyramid incense cones. I used a pencil to do the design.
Step 3
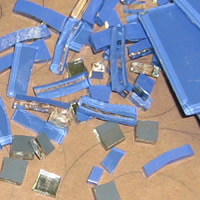
Cut your mosaic tiles into small, thin bits. You will be trying to create little squares or triangles. We will be using quite a lot of tiles in tis mosaic project, and the thinner you can get them, preferably with a bit of a round shape to each piece, the better.
There is quite a trick to cutting the mosaic bits with a round shape and I find the best way is to cut long rectangles about 2cm by 4 or 5 cm, and then, holding the rectangle in your hand, use the two wheel tile cutter to cut the bits in the middle each time.
You will find that they almost automatically create a curve.
Step 4
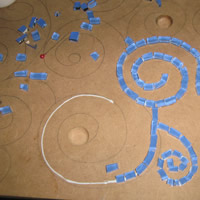
I have now gone over the basic pencil mosaic design with the wood glue so that I have a nice amount of glue to stick my blue mosaic bits to. Start by creating a nice solid blue line that will be clearly visible. Make sure that your blue swirl is definite in shape and design.
Step 5
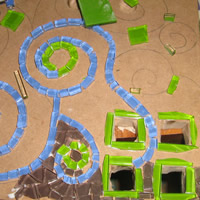
You can now put your green bit where you would like them to go. I am going around all the inner bits of my swirls on the mosaic design and around the incense box holder bits.
Step 6
After all your blue and green swirls are done, all you have left to do is the background colour. Try to follow the general mosaic design of the blue swirl. You want to be following each of the swirls so that you don’t have chunks of brown. Cut your background mosaic tiles in the same shapes and sizes as the blue and trace the blue swirls.
Step 7
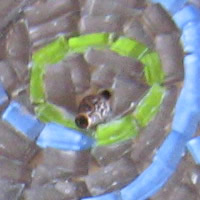
Once all your background is done, you can glue your bead incense stick holders into place. These are just long beads that can be placed into the grout over the hole you drilled for the incense sticks. The idea is that the bead sticks up out the mosaic and you don’t have to keep looking for the hole. I have used wood glue to stick the bead into place. It will stick very well once dry, but while drying you might want to keep it in place with a few bits of mosaic tiles. Be careful when you stick it down not to fill the hole with too much glue.
Step 8
Keep going until all the parts are filled and are ready to be grouted. It is recommended to leave mosaic projects overnight to make sure the glue has dried properly.

Step 9
Grouting a mosaic:
Choose a colour grout that is neutral and won’t conflict with any part of your design. I have chosen to go with a dark brown so that it blends in with my background rather than contrasting it.
It is quite difficult to establish exactly how much grout you need for a particular mosaic project. The amount of grout you need depends on how big your board is, as well as the sizes of the spaces left in between each bit of mosaic tile stuck on the board. What I usually do is have a few smaller mosaic projects on hand to mosaic when I am done on the big one, that way I can use up any leftover grout.
This saves wasting and makes cleaning easy as there is no safe or good way of discarding of extra grout.
Tip: Do NOT wash the excess grout down the drain when you are done, the grout will dry in the drain and cause a blockage. You need to use up as much of the grout as possible, then add water to any leftovers and throw it into the garden so it can mix into the soil.
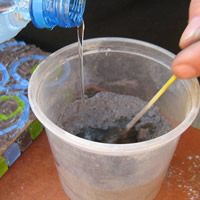
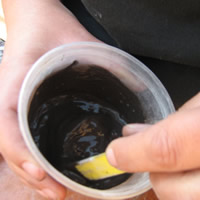
Put some grout in a bowl. Start by adding a little bit of water at a time and then mix it at each step. You have to be careful not to put too much water in it, as it goes from very dry to very runny quite fast.
Rather add a little bit at a time than end up with a runny solution. If you add too much water, the best way to fix it is to add more grout, but only if you have the need for it as this could be quite wasteful. If you have added far too much water, you might need to consider starting again. We are trying to obtain a soft toothpaste consistency, a bit like mayonnaise.
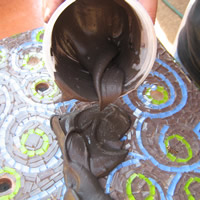
Step 10
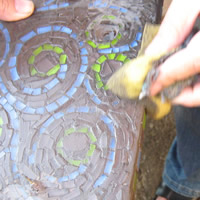
At this point, I’d recommend using a pair of gloves to protect your hands as the grout dries your skin very quickly. Using a grout applicator, old credit card or a bit of high density sponge, place some grout onto your picture and start spreading it out, making sure you work it into all the gaps and spaces.
Be careful not to cover your holes for the incense pyramids with grout.
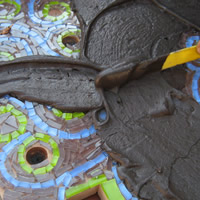
Step 11
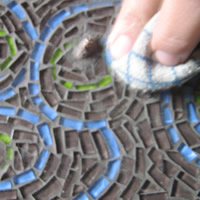
Work the grout into the gaps on your mosaic project as much as you can, and then take off the excess grout with a hard sponge like high density foam.
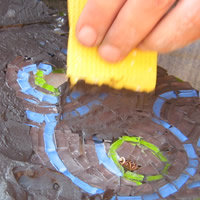
Step 12
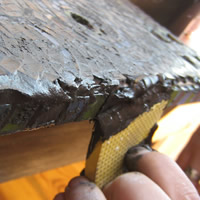
Do the edges as you would the top, and leave excess grout on the edges so you can wipe them smooth with a cloth later on, rather than trying to get a perfect edge at the point.
Step 13
Leave your mosaic project to dry for a few hours.
Step 14
You can now wash the mosaic incense burner down with a wet sponge and shape the edges as you go.
Step 15
Leave this to dry overnight and then wipe it down with a dry cloth.
Step 16
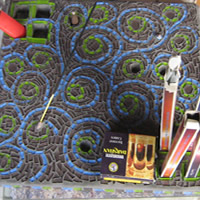
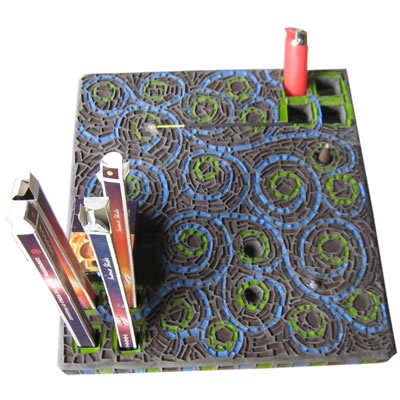
Hooray!
Your mosaic project is now complete and is ready for use!