
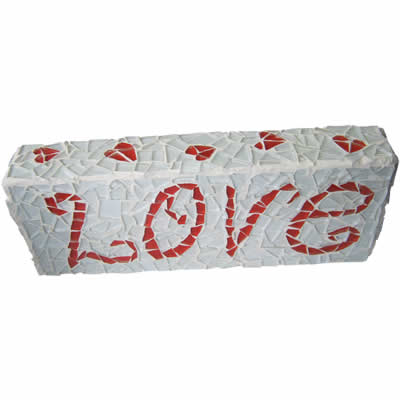
Easy step by step instructions showing how to make your own mosaic love block, a fantastic Mothers Day gift, presented by Crafty Corner
For any questions contact us via email
This is a great, easy step by step mosaic project to create a beautiful mosaic on a piece of wood. Follow our instructions and make a beautiful handmade gift for Mom on Mothers Day, or use it as a Valentines Day gift! This is a great mosaic project for your next craft project.
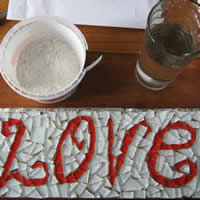
What you need to make a mosaic love block:
- Timber Block (size depends on your preference)
- Mosaic tiles, we used white & red
- Two wheel tile cutter
- Marker pen
- Glue
- Water
- Tile grout (we used white)
- Mixing bowl
- Ice cream stick
- Sponge
- Old dry towel
- Plastic or latex gloves
To create a beautiful handmade work of art for your Mom on Mother’s Day, you can decorate a timber block for your next mosaic project!
Step 1
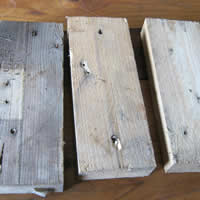
You will need to find an old piece of timber, from the garage or garden. Our timber block is approximately 250mm X 30mm. You can make yours larger of smaller, but keep in mind that you will need much larger quantities of tile, glue and grout if your timber is larger and of course, much more patience if working on a smaller scale!
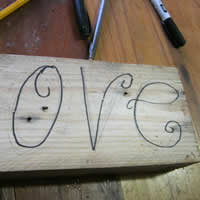
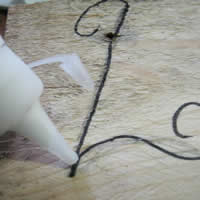
Step 2
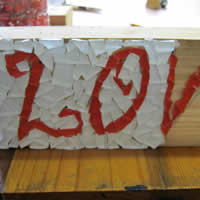
You will need to use your marker pen to mark out the lettering on your timber block. We have used freehand to write ‘Love’ with a few swirls onto our block. You can do this on one side or both sides if you wood like a double sided mosaic block. Space the letters out a bit, to allow for the width of your mosaic tiles.
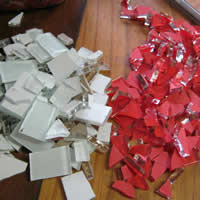
Step 3
Prepare your mosaic tiles by cutting them into small, randomly shaped bits using the two wheel tile cutter. We have cut our red mosaic tiles into much smaller pieces, as we need these for the finer details such as the lettering. Our white tiles are a little bit larger as they are covering the background where there is no detail.
Step 4
Right, now we are ready to start our mosaic project!
When doing mosaic, it is always a good idea to start in the areas where there is fine detail, so we will start by doing the lettering first. Use your glue to stick each mosaic tile into place on to the lettering. You want to complete a letter at a time. You can perform this step by either applying the glue to the block directly, or you could apply the glue to each individual piece of tile as you stick it down. Try to get the pieces very close together for extra definition.
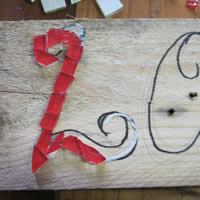
Step 5
Use your eye to judge which mosaic pieces will fit better along the line for the lettering. Generally, the ‘up’ and ‘down’ strokes in lettering are a bit thicker, so use wider pieces for these and thinner pieces on the top and bottom angles of each letter. Use your tile nippers/cutter to re-shape the mosaic tile pieces, for smooth lettering if you need to. Slowly continue, piece by piece, completing one letter at a time.
Step 6
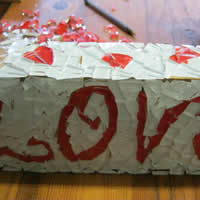
Keep going until you have covered the lettering in the red mosaic tiles.

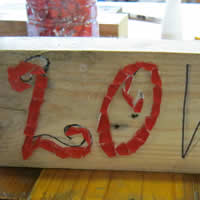
Step 7
With the lettering complete, we can now begin to fill in the background. Work from one side across. Apply the glue to the timber surface and work in the white mosaic tiles. You can work a bit quicker here and leave slightly larger gaps between the mosaic tiles as this is just the background.
Apply enough glue to the wood so that you can stick a few mosaic tiles down without having to keep stopping to apply more glue.
Step 8
Slowly work your way across, from one side of the mosaic project to the other until the background is filled.
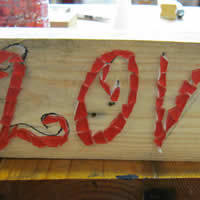
Step 9
Now you can mosaic the opposite side of the mosaic project, as well as the two edges. You may have to do this in stages to allow the glue on one side to dry before moving onto the next side.
Step 10
Once we have mosaicked all four sides of the mosaic project, there is just the top to do!
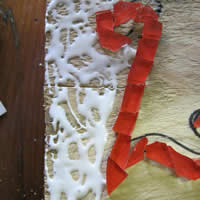
We have a heart design on the top of our timber board. You can create this by using your tile nippers/cutter to make two triangular shapes for the lower part of the heart, and two semi-circular shapes for the top of the heart. The shortest side of the triangle is paired with the flat edge of the semi-circle. Now both shapes are placed alongside each other and glued into place to create the heart shape.
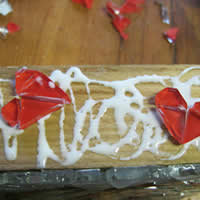
Step 11
With the mosaic hearts in place, we need to fill in the background to complete the mosaic project. Once the background has been filled on every side of the mosaic love block, leave to dry for 24hrs before moving onto the next step.
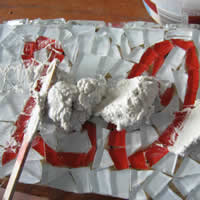
Step 12
Time to grout!
Now would be a good time to slip on plastic or latex gloves, especially if your skin is quite sensitive. Grout sucks up moisture and can leave your skin very dry.
We have used white grout, to better match the white background tile, which will increase the impact and definition of the red tiles for our ‘Love’ lettering on this mosaic project.
Step 13
Place the grout into your mixing tub. Grout goes from being too thick to being too runny very quickly, so rather work with a little extra care and add a little water to the grout bit by bit, mixing each time to see if you have reached the right consistency.
The right consistency for mosaic tile grout is that of a thin toothpaste, or mayonnaise. Make sure you have crushed any lumps and scraped the sides of the container.
Step 14
Dump the grout onto your mosaic project using an ice cream stick.
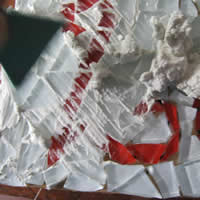
Step 15
Use a firm sponge to work the grout into all crevices. This is bit like spreading margarine on a slice of toast, just make sure the grout fills in all the spaces and cracks between tiles on your mosaic project. Leave to dry.
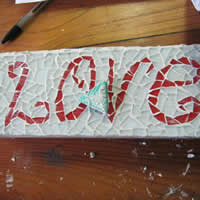
Step 16
Once the grout is dry, use a damp sponge or cloth to wipe away the excess grout, and then lightly polish the tiles with a dry cloth to bring a shine to your mosaic project.
Your mosaic Love block is now complete and ready to be given to Mom on Mothers Day.