Mosaic Resin Pot
Step by step on how to make a beautiful mosaic resin pot, presented by Crafty Corner
For any questions contact us via email
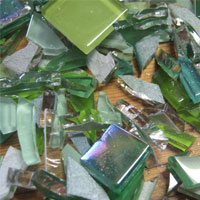
I have chosen to mosaic onto a resin pot that I am going to put in my bathroom. My bathroom is green and white, so I have taken all the random bits of broken green mosaic tiles lying around and chopped them into uneven sized bits and mixed them together. Then I used an old broken mirror to cut small bits of mirror for top section of the pot, and added some mosaic stones for more texture.

What you need to make mosaic resin pot:
- Resin pot, available from Crafty Corner
- Mosaic tiles, in your choice of colour
- Mirror
- Two-wheel tile cutter
- Wood Glue
- White grout
- Water
- Mixing tub
- Ice-cream stick
- Pencil

Read through all the instructions first before starting this craft.
Step 1
Cut up all your mosaic bits in the colour of your choice and make a pile. Also cut up some mirror into small random mirror bits and place these in a seperate pile.

Step 2
Using a pencil or felt-tip pen, draw a random zig zig design onto the pot to define the top and bottom sections. We are going to do the bottom section in green and the top in mirror.

Step 3
Start by gluing an area the size of a R5 coin and then pick up bits of the green tiles in random order and placing them on this section. You need to hold the pot at an angle as the glue will take a while to dry and you need to let the tiles stick a bit before you move onto the next section.


Step 4
Work a small section at a time until you have gone all the way around the pot with green. Try to work neatly around the zigzag so that you get a distinctive line. This is a slow process and a project that needs to be done over time. Don't try to rush it or you will have bits falling off all the time and driving you mad. You can use silicone to glue the tiles if you don't like waiting, but as the pot is porous the wood glue will work perfectly well if given enough time to dry properly.

Step 5
Once the green tiles are done you can go ahead and start on the mirror bits. Every now and then inserting a stone for some extra texture.

Step 6
Cut 2cm square tiles in half, you will need about 12. Glue them around the top of the pot to finish it off.


Step 7
Leave it overnight to dry as the wood glue will take quite a while to dry properly on the resin surface.
Step 8
Now we need to grout the project. For in-depth instructions on how to grout, please refer to Step 13 of our Mosaic Teddy on Moon project.


Step 9
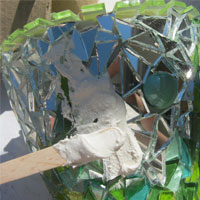
Before washing off the grout, your pot should look like this.

Step 9
After washing off the grout, add some soil and a plant to complete your mosaicked resin pot.


