

Upcycled Mosaic Hairdresser's Basin
Easy step by step instructions showing how to make your own upcycled mosaic hairdressers basin, presented by Crafty Corner
For any questions contact us via email
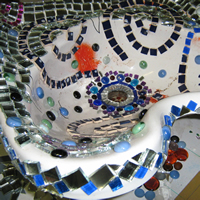
In this Step by step project, we will show you how to upcycle a hairdresser's basin into a beautiful water feature for your garden. You can use this upcycled / recycled hairdresser's basin as a bird bath, water catchment under the garden tap or as a striking water feature in the garden, it is an exquisite outdoor feature!
You could use any old basin, toilet cistern, or if you were feeling adventurous and happened to have one lying about, recycle and mosaic an entire bath as an outdoor water feature!
Please note that this is not a beginners mosaic project ;-) Follow our easy step by step instructions to see how to make your own upcycled mosaic hairdressers basin!

What you need to make an upcycled mosaic hairdressers basin:
- Old hairdresser's basin (or regular basin, cistern or similar)
- Mosaic tiles, in your colour choice
- Two wheel tile cutter
- Silicone
- Permanent marker
- Water
- Tile grout
- Mixing bowl
- Ice cream stick
- Sponge
- Old dry towel
- Plastic or latex gloves
Step 1
To begin this project, take a look at your hairdressing basin and decide on your design pattern. Pay particular attention to the shape and interesting contours of this basin. Formulate your design flow and pattern based on these elements.
Use your marker to mark this out, but remember to keep it relatively simple. For example, use swirls and fill in the remaining areas with sections of colour or mirror.

Step 2
With the basic design marked out on the basin, we can start applying the mosaic tiles to these main pattern lines.
Use your silicone and expel a small bit onto the back of each tile before placement onto the basin. Alternatively, use your silicone to mark out the lines and then stick the mosaic tiles down, onto the pattern line. There is a good example of this technique on our Mosaic Plant Stand step by step.


Step 3
Once you have mosaicked all of the primary pattern lines, you can start filling in the 'blank' areas.
If you are a mosaic beginner, you can fill in the blank areas with one type/colour tile, this will pronounce your pattern lines when complete and give a very easy on the eye finish to the product.
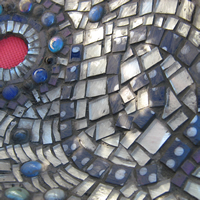
If you are a keen mosaicker, you can fill in the blank areas using more subtle pattern techniques and designs, employing various textures, colours and mosaic tile shapes. This will give your finished product a depth and detail which will be more interesting to the eye.


Step 4
Keep going, until your entire basin is filled in with mosaic tiles or mirror bits. Once complete, leave for 24hrs so that the silicone glue can fully cure.
Step 5
Time to grout! To keep the drainage hole from filling up with grout, place a rubber seal in the hole before grouting. We used an old piece of red foam. If you are stuggling to find a piece of foam, simply wedge something, even newspaper in the plug hole. This can be removed once the grout is dry to reveal the clean drainage hole.
Step 6
Place your grout in the mixing bowl. If you are using white grout and want to darken it, as we have done, simply add black oxide powder to the grout. This is available at hardware stores. Keep adding black oxide powder until you are happy with the shade.
Step 7
Mix water into your grout, and stir using the ice cream stick. Grout goes from being too thick to too runny very quickly, so add just a little water at a time and mix to check the consistency. Remember to also crush any lumps and scrape the sides of the container to make sure it is all thoroughly mixed.
Grout is at the correct consistency when it is a little softer than toothpaste, or about the same consistency as mayonnaise.
Step 8
Apply the grout to the mosaic hairdresser's basin using your ice-cream stick, and then spread it around using an old credit card, hard piece of foam, polystyrene or even card. Make sure to work the grout into all the cracks, ensuring that all crevices are filled. We have used a dark grey grout because it complements the mirror we have used wonderfully.
Step 9
Again, using your foam, old credit card or piece of foam, gently scrape the surface to remove excess grout. Now use a soft sponge to further remove excess grout and leave to dry thoroughly.

Step 10
Once the grout has completely dried, use a damp cloth to further remove the excess grout and buff up the mosaic tiles to bring a shine. Your recycled hairdressing basin is ready to be placed outdoors, to start its new life as a water feature or birdbath! Simply use a regular basin plug in the drainage hole to stop water from running out.


Step 11
Mount the upcycled mosaic hairdressers basin under a tap, fill with water and enjoy! If you are using your mosaic hairdresser's basin as a birdbath, make sure to mount it in the shade, the sharp reflection from the mosaic tiles and mirror bits will scare birds away if placed in direct sunlight.