
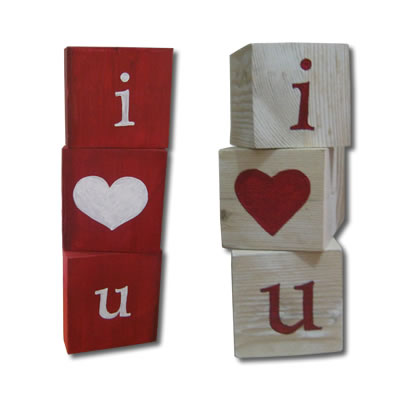
Step-by-step on how to make “I love U” blocks for Valentine’s Day, presented by Crafty Corner
For any questions contact us via email
What you need to make wooden I love you blocks:
- Sandpaper to sand blocks
- Red and white paint
- 1x thin paintbrush, 1x thick paintbrush
- Carbon paper
- Pencil
- Newspaper
- Stencils for “I”, “heart” and “U”, or the designs on paper
- Aprons or cloths for cleaning in case you mess
Make sure you have a clean and tidy work surface. This is a messy craft and could do damage if you mess, so make sure you work through this craft carefully.
Step 1
Cut out wooden blocks from old offcuts of wood. In our case we used old wooden pallets.
Reycling or re-using wood rather than having it end up in a landfill is a great way to help save the planet. The bonus is you have a really beautiful gift you could give to someone for Valentine’s Day. The blocks don’t need to be any specific size – so use whatever wood you happen to have and just cut it into cubes.
Step 2
Using the sandpaper, sand the wood to give you a nice, smooth surface to work on with no splinters.
Step 3
Using the thick brush, paint the surface of the wood with your base colour. We have used red PVA for the one set, but you can use enamel, or upcycle any paint you have lying around. You can even mix colours if you follow our colour mixing techniques in the DIY secion.
Remember that you need very little paint for this project so see what unused paint you have lying around rather than buying new.
Step 4
Once the blocks have been painted, leave to dry for 2 hours or so, and then give them a light sand.
Step 5
Paint the blocks again – they’ll look much better with a second coat of paint, and then leave to dry.
Step 6
If you are using a stencil, simply stencil the designs onto the wooden blocks. If you don’t have a stencil, place a piece of carbon paper over your wooden block, place the design on top of the carbon paper and then trace it. When you remove the carbon paper, the design will be on the wooden block.
Step 7
Use your contrasing colour and a smaller, finer paintbrush, and then paint the design onto the wooden block. You might need to do two or three coats to get a solid, uniform colour.
You could do the design on just one side and make three blocks to get the “I love U”, or you could make one block with I love you on the one block like a die. If you do it on just one block, make sure that the opposite ends have the same design/
Step 8
When you are done, you can finish off your blocks by painting with a coat of Dala hard varnish or something similar. This will help protect the blocks from damage. These wooden blocks make ideal gifts for Valentine’s Day, or as a gift for someone special.