

Kids Party Garland
Step by step instructions showing you how to make your own beautiful party garland decorations, presented by Crafty Corner
For any questions contact us via email

Create the perfect party vibe! In this quick and easy kids upcycling project, we will use old bits of wool and ribbon to create a Party Garland!
What you need to make party garland:
- Old lengths of wool
- Old lengths of ribbon
- Scissors
- Work surface
Step 1
Gather all of your old bits of wool, ribbon and your scissors onto your working surface.

Step 2
You will need to cut your bits of wool into equal lengths using your scissors. We cut them into strips about 10cm in length. The number of lengths of wool you need depends on how long your finished party garland needs to be, the longer the garland, the more wool you will need to cut.


Step 3
Now take one or two lengths of each colour and line them up.


Step 4
Use another length of wool to wrap around the bunch of coloured strands of wool, wrapping it at the middle of the bunch (i.e. about 5cm).

Step 5
Tie a knot here, securing all of the strands on the bunch, at the middle. Make a double knot to make sure it is secure and won't shift.


Step 6
Now, grasping the folded bunch of wool, lift one end of the knot from under your finger, to create a loop as illustrated.

Step 7
Now take the other end of the knot and wrap it around the folded over section, securing the first end of the knot inside the wrap. Wrap until you have a short length left and tie to the first knot end, securing the wrap in place.

Step 8
Cut off any excess wool bits with your scissors.
Repeat this process (Step 3 7) until you have a number of little upcycled tassels for your garland.

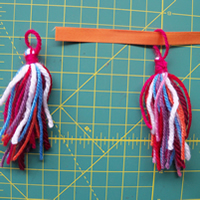
Step 9
When you have many tassels you can start placing then on the ribbon.
Start by threading the ribbon through the loop on a tassel. Tie a knot in the ribbon, over the tassel loop, to secure it into position. Now repeat this, threading the ribbon through the other tassels and tying a knot over them, at evenly spaced intervals on your ribbon.


Step 10
With the number of tassels you create, you could fill the length of the ribbon that you have chosen, or you can spce it out for a more sparse look, this is up to you!
Once you have filled up your ribbon with tassels, your party garland is complete and ready to hang up for a cool party!