

Father Christmas Finger Puppet
Step-by-step on how to make a Father Christmas finger puppet, presented by Crafty Corner
For any questions contact us via email

What you will need:
- Father Christmas template
- Red felt
- White felt
- Scissors
- Construction glue
- Ice-cream stick
- Pins
- Decorations/sequins for eyes
Step 1
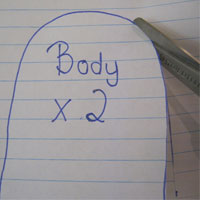
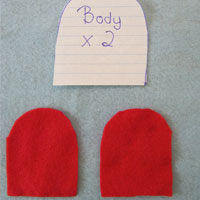
Cut out the body pattern for the Father Christmas felt finger puppet from the pattern template. Templates are available through Winnie, or you could even draw your own!

Step 2
Pin or hold the body template firmly on the red felt.

Step 3
Use the scissors to cut out the body template from the red felt. Redo this step as you need to have two body pieces of red felt.

Step 4
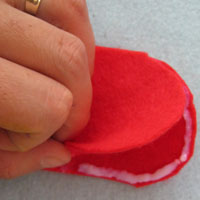
Apply construction glue on the edges of one body piece using the ice cream stick. Gently place the second red felt body piece on top of the first body piece. Do not press hard or the body section of the finger puppet will not glue properly. Make sure the bottom is not glued as this is where your finger will be inserted once your Father Christmas finger puppet is complete.

Step 5
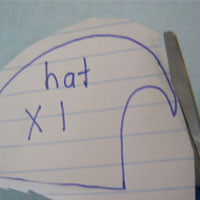
Using the scissors, cut out the template for the Father Christmas hat.
Step 6
Pin or hold the hat template on the red felt, and cut out the hat.


Step 7
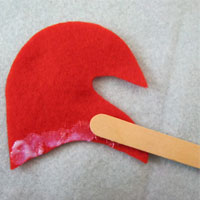
Use the ice cream stick to apply construction glue to the bottom of the hat. Glue the hat to the top of the Father Christmas finger puppet body piece.

Step 8
Using the ice cream stick, place tiny blobs of glue where you want to have eyes for Father Christmas. The eye decorations must be placed firmly and equally spaced. Gently press the sequins into place to create eyes for your Father Christmas fingerpuppet.


Step 9
Cut out the dot on your template. Attach to the white felt and cut out 16 white felt dots.


Step 10
Apply glue to the base of Father Christmas' hat and stick a row of four white felt circles.


Step 11
Keep one white felt dot aside, and use the remainding white felt dots to create a beard for Santa.


Step 12
Stick the remaining white dot onto the end of Santa's hat to creat a pompom.


Step 13
Cut out the moustache template, and then cut a moustache from the white felt.


Step 14
Complete your Father Christmas fingerpuppet by gluing the moustache between the eyes and beard of your fingerpuppet.