

Clay Lizard
This is a fun, easy craft for children from the age 10. Younger children tend to struggle with forming the head of the lizard, but with a little help they enjoy the painting at the end. Clay is excellent for improving fine motor skills and exercising the hand muscles.
Step-by-step on how to make a Clay Lizard, presented by: Crafty Corner
For any questions contact us via email
What you will need:
- Darwi classic modeling paste (you can get this at CNA). Das Pontac clay can also be used.
- A variety of different colours fabric paint or acrylic paint.
- Paint brushes.
- Glue – wood glue or Dala construction glue.
- Clear varnish or Modge podge.
- A small container for water, used to attach the legs and clean the brushes.
- Craft knife.
- Small eyes, which you can purchase at scrapbooking stores.
- Two 1,5cm pieces of 0.7 gauge wire.
Read through all the instructions first before starting this craft. Make sure you have all required items on hand. Sculpting and moulding is a fantastic way for kids to exercise their hands and fingers, and be creative at the same time!
Step 1
Take a piece of clay and mould it into a ball shape, it does not have to be a perfect ball.

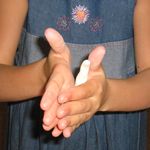
Step 2
Gently roll one end of the ball on the edge of your palm, forming a snake-like tail.
Step 3
This is what it should look like.

Step 4
On the round end of the piece of clay, use the tips of your fingers to form a diamond shape, without breaking off the rest of the body.

Step 5
Gently use your finger tip to cover the one side of the lizard's body with glue. Place the body onto your rock, and gently press it down to make sure that the body is attached to the rock.

Step 6
Take another piece of clay, and roll four 2.5cm (depending on the size of your lizard's body) worm shaped pieces out of it for the legs. Attach the legs with some water on your fingertips, making each one part of the body.

Step 7
Use your craft knife to cut two stripes into the tip of each leg; this will create 3 little toes for your lizard. Do this on each of the four legs.

Step 8
Your lizard is ready to be painted. Choose the colours of your choice, you can make stripes on the back or spots, or just paint it different colors.

Step 9
Insert your two pieces of wire into the front of the lizards head. Glue the eyes onto the head.

Step 10
You can paint over the lizard once it is dry with clear varnish or Multicolage Acrilex to harden it even more and prevent weathering. The lizard on the rock can be used as a door stopper, or a paper weight depending on the size you have created. Well done! What a beautiful creature it is.