

Weaving box
Step by step instructions showing how to make your own weaving box, presented by Crafty Corner
For any questions contact us via email

What you need to make weaving box:
- A packaging/shoe box (if using a packaging box make sure it is not too deep)
- Craft knife
- Wool or crochet cotton
- Scissors
- Sewing needle of safety pin
Make sure you have a clean and tidy workspace.
Step 1
Remove lid from the box. If this is a carton and does not have a lid you will need to cut off as much of the top section so that you will be left with a base of the correct depth.
Step 2
Take the craft knife and cut 1 cm slits into the side of the box. The spacing between the slits should also be approximately 1cm apart.
 Step 3
Cut the same amount of slits in the other side of the box so that the two sides match.
Step 4
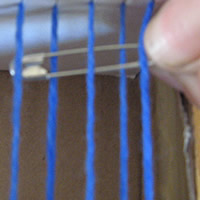
Take your ball of wool/crotchet cotton, and make sure that you leave approximately 1/2 metre of thread behind. Thread the wool into the first slit, then take the wool across the box and insert it into the slit directly opposite.

Step 5
Thread the wool through the second slit on the opposite side. Pull the wool tight and make sure it does not sag during this process.
Step 6
Wind the wool around the bottom of the box and back up to the other side. You can now thread the wool into the second slit.

Step 7
Continue to wind the wool as in STEP 5 and continue until you have wool threaded through all the slits. You now have a box of parallel strings. This is your weaving box.
Step 8
Before you cut your wool , find the beginning 1/2 metre thread and tie it to your end thread, keeping the wool tight.

WEAVING
Step 1
Take a piece of wool, approximately double the length of your arm. Do not make it too long otherwise you will end up with knots in your wool. Thread the wool through your needle, or if working with small children, through the ring at the base of the safety pin.

Step 2
Hold the end of the string with the hand that will not be doing the threading. This is to prevent the end of the wool pulling through. Begin by going over the first string in the box and then under the second one, then over the third and under the forth. Continue in this way until you have reached the final string.
Step 3
Pull the string tight, but make sure you do not pull it all through. You will need to leave a 2 cm piece on the end where we started.

Step 4
You now will go back along the threads, but in the opposite way. In other words, where you went over, you will now go under, and where the thread is under you will now go over.
Step 5
Continue in this way until you reach the end.
Step 6
To tie off your work and to finish, you need to cut the string off of the box in two bits at a time. Cut it as close to the side of the box so you have long strings to work with. Tie the two piecs of string together.


Step 7
Cut another two bits of string halfway down the side of the box and tie them together. Continue this way until finished.
Step 8
You can now take the bits of wool left on the sides and either tie them to each other, or for the more advanced crafter, you could sew them into your woven mat.
Step 9
Make sure all your bits of wool are tied together or sewn in. Cut off all the dangly bits of wool and you have a woven mat.
