
A fun upcycling craft using old keyboard keys
This recycled keyboard keyring is a brilliant way to turn old technology into something fun and meaningful. Instead of throwing away a broken or unused computer keyboard, you can take it apart and reuse the keys to create a handmade keyring.
This project is especially popular with kids because it involves taking something apart, choosing letters, and designing a personalised gift. It’s a great Valentine’s Day craft, but it also works just as well for names, initials, or fun words.
Presented by: Crafty Corner
Skill level: Beginner
Age suitability: 8+ with adult supervision
Supervision note: Uses tools and a craft knife; adults must assist with disassembling the keyboard and making holes in the keys
Materials and tools
- An old computer keyboard
- Keyboard keys spelling L O V E (or any word you choose)
- Red, white, or black waxed cord
- A few matching colour beads
- Key ring
- Craft knife
- Screwdriver and pliers (for taking apart the keyboard)
Before starting, set up a clear workspace and keep small parts in a container so nothing gets lost.
Step-by-step instructions
Step 1: Take apart the keyboard
(Adult help required)
Before making the keyring, it’s time to do some upcycling.
Using a screwdriver and pliers, take the old keyboard apart. Some keyboards are easy to open, while others are more stubborn — don’t worry too much about breaking it. We’re not trying to fix it, we’re giving it a new purpose.
Look for keys that are flat on the back. If a key has extra plastic pieces attached, you may need to snap or trim them off.
Keep all the leftover bits — keyboards are full of interesting pieces that can be used in other projects.
Step 2: Clean the keys
Give the chosen letter keys a good scrub so they’re clean and ready to use.
Dishwashing liquid and a scrubbing brush work well, and the letters won’t wash off. Dry the keys completely before moving on.
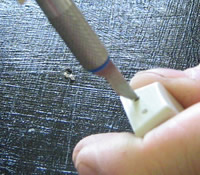
Step 3: Make holes in the keys
(Adult help required)
Using a craft knife, carefully make:
- Two holes at the top of each key
- Two holes at the bottom of each key
Space the holes slightly apart so the key is strong and doesn’t crack. Make the holes large enough for the waxed cord to pass through easily.
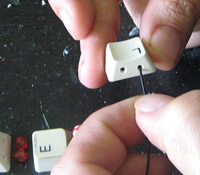
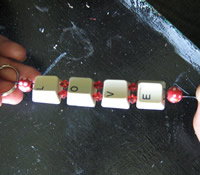
Step 4: Plan your design
Lay the keys out on the table in the order you want them to appear. Place beads between the keys to test your design.
It’s important to use two beads between each key, as this helps stop the keys from spinning around once the keyring is finished.
Once you’re happy with the layout, you’re ready to start threading.

Step 5: Cut the cord
Cut a piece of waxed cord long enough to:
- Be doubled over
- Fit all the keys and beads
- Leave extra length for knots
It’s better to cut a little too much than too little.
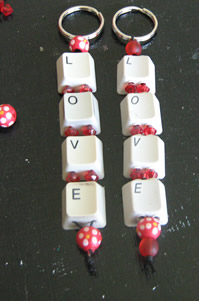
Step 6: Attach the key ring
Thread the waxed cord through the key ring and fold it in half so the key ring sits in the centre of the cord.
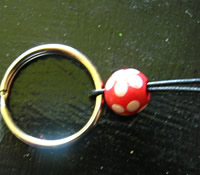
Step 7: Secure the top bead
Thread a larger bead onto both strands of the cord. This bead helps hold the key ring firmly in place.
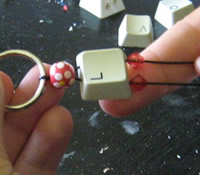
Step 8: Add the first letter
Separate the two strands of cord.
Thread one strand through the top left hole of the L key and out the bottom left hole.
Thread the other strand through the top right hole and out the bottom right hole.
The key should now sit flat and face forward.
Step 9: Add spacer beads
Thread one small bead onto each strand of cord.
These beads help keep space between the letters and stop them from rubbing together.
Step 10: Continue with the letters
Repeat Steps 8 and 9 for the remaining letters until all the keys are in place and the word is complete.
Step 11: Finish the keyring
Once all the letters are threaded, add one or two beads at the bottom if you like, then tie secure knots to finish off the keyring.
Trim any excess cord.
Extra ideas
Use leftover keyboard parts in collage or sculpture projects
Have fun, and Happy Valentine’s Day
Use the letters of a child’s name instead of LOVE
Make matching keyrings for family members
Try different bead colours for different themes