

Coffee Tin
Step by step instructions showing how to make your own decorated coffee tin, presented by Crafty Corner
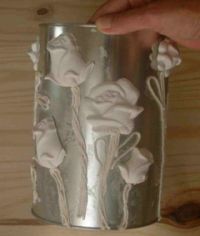
For any questions contact us via emailI love turning throw away stuff into usable things. There are a lot of different things to be done with empty tins, big or small, round or flat. Here I used a coffee tin, open roses and buds plaster castings and some string to form and shape the stems. Please bear in mind that any item made using grouting and plaster will need to be handled with care.

By: Rene’ Bornman
What you will need:
- Empty tin can washed and dried
- Cement grouting
- Plaster of Paris flowers
- Water-based / Acrylic paints
- ±1m String / Rope / Wool
- Brushes
- Masking Tape
- Contact Adhesive
Read through all the instructions first before starting this craft, and make sure you have the plaster paris flowers made and ready to go. There are three processes that need to happen concurrently.
Step 1
Place a good dab of glue on your castings. Let it dry for 15 – 20 seconds and position on tin.

Step 2
Use masking tape simply to hold the casting in place until the glue has properly dried. Depending on where you live and what glue you used, this could be anywhere between 15 – 45 minutes.
Do not be concerned if your casting is not flat on the tin, as we will sort this later.
Step 3
Measure out pieces of string depending on the width of the ‘stem’ required.
Step 4
Twist some strands of string together and stick to the tin with glue.
It doesn’t look like much now, but the idea is taking shape. Also use the string to create some ‘leaves’.
Place the tin one side until all the glue has dried properly otherwise the ‘stems’ will come undone when you start painting. At least three hours. Tame off the masking tap
Step 5
Mix the cement grouting to the consistency of thickened cream.

Step 6
Take a flat, broad paintbrush and paint the grouting on the tin, the castings and over the string. Paint a bit extra in under any castings that are not flat on the tin. This just secures them nicely and then later they won’t break off.
Step 7
It is better to apply 3 - 4 thinnish coats. Leave to dry for a few minutes between each coat.
Step 8
You may also find that one or two light coats over the castings is more than sufficient otherwise the castings may start to loose their appearance. See how the string now takes on the form of an actual stem.
Step 9
Leave this o dry out for a while before paiting. The nice thing with the cement grouting is that it will hold any type of paint.

Step 10
Paint your tin according to your color scheme, using dry brushing.
Step 11
Seal with a very good varnish, either with a brush or spray on.
There you have it- handle with care!