Recycled Milk Bottle Clock
Step by step instructions showing how to make your own beautiful clock by recycling Douglasdale milk bottles, presented by Crafty Corner
For any questions contact us via email

There is so much we can do with all the rubbish that we throw away. With this project we collected plastic milk bottles which would have otherwise ended up in the trash and eventually on a landfill site.
The first thing you need to do is select the right milk bottles! If you do quite a bit of crafting, you might even change brands to get the right bottles you need! We like Douglasdale milk bottles best.
Some brands of milk use bottles that have labels that are very hard to remove, which makes it hard to repurpose or upcycle into another product, as you first need to spend time soaking and scrubbing to get the labels off. For most crafts, we want a large flat section of plastic to work with, and some bottles have ridges on the side which again make it hard to recycle. Douglasdale milk bottles are the easiest milk bottles to work with, as the labels are easily removed and the bottles have a large flat middle section.
Recycling and making new and interesting upcycled products from waste materials is quite easy to do with just a little effort and creativity, and helps relieve the enormous pressure on our landfill sites, and ultimately, our planet.
We reduced our carbon footprint by recycling used Douglasdale plastic milk bottles, turning them into this beautiful, upcycled clock - a great handmade recycled gift that really makes a difference and is easy to make! Follow our easy step by step instructions and make your very own recycled milk bottle clock!
What you will need:
- Sturdy table or work surface
- Clock mechanism and hands
- 8x 2 litre Douglasdale milk bottles, washed and ready to be recycled
- 25cm x 25cm square piece of chipboard. Your chipboard will need a 10cm x 10cm indent in the centre on one side, at approx 1.5cm depth to allow for the clock mechanism.
- Metal ruler
- Craft knife
- Pencil
- Staple gun
- Acetone (for cleaning)
- Old rag (for cleaning
Step 1
Use your craft knife to cut the milk bottles: You will need to cut each milk bottle twice, going right around the bottle.
The first cut should go around the bottom (approx. 3cm from the base) and the second cut just lower than the handle. You should be left with a very thick centre piece of the plastic milk bottle, which should be approx. 10cm in width.

Step 2
Once you have cut all eight plastic milk bottles to acquire your 8 centre pieces, cut these once across the width in a straight line, so that you will have one long piece of plastic. You will now have eight strips of recycled plastic, as opposed to eight ovals.

Step 3
Now we just need to straighten our strips, this is quite important so that our clock has a nice finish. Place the large strip flat on your working surface and use your metal ruler to trim the strip to get a nice, straight edge.
Step 4
Now, using your metal ruler, measure onto the bottle strip at 3cm intervals using your pencil. Then, use your ruler to hold the bottle strip in place, and guide your craft knife to cut each strip on the measured markings. You should be able to acquire two 3cm strips from each initial plastic bottle strip.
At this stage, your plastic is hardly recognisable as old Douglasdale milk bottles, and you are halfway to creating something incredible by way of recycling!

Step 5
Now you should have all of the plastic strips that you need to make the recycled clock, and you are now ready to attach your strips to the board.
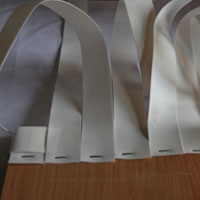
Place one strip diagonally and place your board over this strip, ensuring that the left edge of the strip is in line with the left edge of the board. Now bring the top of the strip over the top of the board and use your staple gun to secure it into position.

Step 6
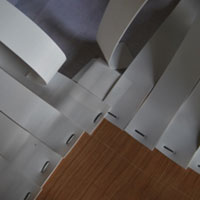
Proceed to secure further strips into place in the same way. Make sure that all strips are lying alongside each other, edge to edge with no spaces between the plastic strips.
Once you have filled one side of the board (left to right) you should repeat this process on the left side of the board. Securing your strips, edge to edge from top to bottom of the left side of the board.
Step 7
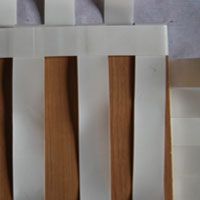
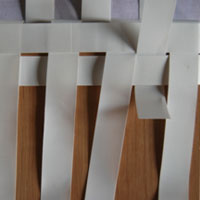
Now turn your board over. Take your entire top section strip and bring them down to the bottom of the board. Begin weaving your right hand side strips, from top to bottom, through the top strips. Remember to begin your weave over the first strip then under the second, over the third and under the fourth, and so on.
With your second strip, begin your weave under the first, over the second, under the third and over the fourth, and so on. Your weave will be nice and tight at first, but will start getting slack as you finish off – this is not a problem, you will tighten them up when you finish off.

Step 8
Carefully turn your board over again, so that your weave side faces down. All the strips on the left side and top side of the board will be secured already. Now it is time to secure the strip on the right side and bottom side of the board. To achieve a nice and tight weave, you want to start on your bottom left and pull the far left strip tightly before stapling it onto the board.
Now move up to the top right and take the top most strip and pull it tightly before securing to the board. Again, move down to the bottom left and pull the next strip tightly before securing. Again, up to the top right and repeat this process until all strips are successfully attached to the board.
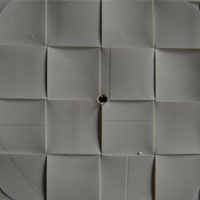
When completed, turn your board over to reveal your completed weave.
No one would ever guess that you have just turned your old plastic milk bottles into this creative and useful recycled piece of work!
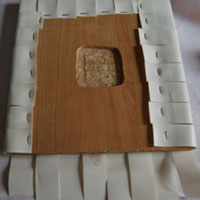


Step 9
Before you can begin cutting designs into the recycled milk bottle plastic, we will need to measure the centre radius so that the clock hands will be able to move freely.
Using your metal ruler, find the centre of your board by marking it at half of 25cm (12.5cm) both diagonally and horizontally. Use a drill to create a hole in the centre of your weave and board – this is to allow the clock mechanism to be placed.
Then, measure your clock hands, using the longest arm for the width of the radius that you need around the centre and mark this out onto your clock face so that you do not cut designs into this area.
Step 10
To begin cutting the plastic to form designs in your weave, we suggest a simple geometric design, which will allow the plastic to lift, creating interesting shadows on the stark white weave surface.
Using your craft knife, cut three lines, creating an unfinished square on one of the squares of plastic in your weave. You will want to cut through the first layer of plastic but not through the second, so cut with caution. Repeat at intervals on your weave, to create an interesting pattern, moving from the outer to the inner of the board, and making sure not to cut in the central radius where the clock hands will be.

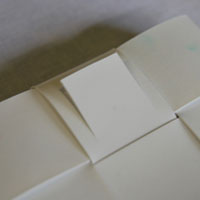

Step 11
Okay, with all designs now cut into the plastic, your board is ready to become a recycled Douglasdale milk bottle clock! First use some acetone and an old rag to clean any pencil marks on your plastic and get your clock hands and clock mechanism ready.
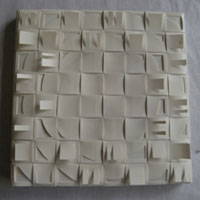
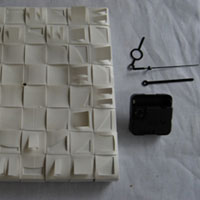
Step 12
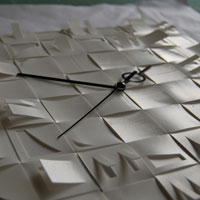
Now, place the mechanism onto the back of the board, so that the centre of the mechanism is protruding through on the weave side. Make a small hole using a craft knife if you need to. Place your clock hands onto this protrusion and secure.
Step 12
Insert batteries, set the time, and your upcycled plastic milk bottle clock is now complete!


