

Teak floor coasters
Step by step instructions showing you how to make your own coasters from old wooden parquet flooring, presented by Crafty Corner
For any questions contact us via email
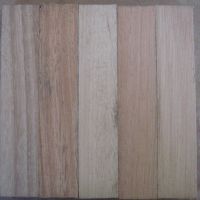
Recently we were lucky to be given several bags of teak parquet that had been lifted to make way for tiles. These bags have been sitting for days on end waiting for an idea to grab us.... Follow our east step by step instructions and see how easy it is to turn old parquet flooring into new wooden coasters!
What you will need:
- 10 pieces of parquet or more
- Wood glue
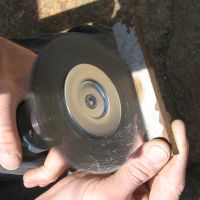
- Wire brush for drill
- Sanding machine
- Wood doc

Step 1
Select at lease 10 pieces. Try to make sure that they are approximately the same thickness. This will reduce the amount of sanding you will need to do.

Step 2
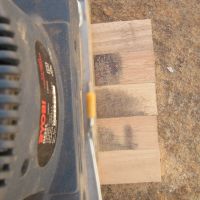
Clean the back of the parky pieces with your wire brush, I found holding the between knees is the best way to do this when you are doing it alone. Make sure you remove all the old cement and glue off the back and anything on the sides as well.
Step 3
Take 5 pieces and lay them side by side on a tile, or something that will not bond to the wood glue, e.g. plastic. This is so that you can move the coaster aside when wet and you waiting for glue to set.

Step 4
Apply an generous amount of wood glue, using your finger tips spread this evenly over all the pieces.

Step 5
Place the second layer of cleaned pieces onto the first layer. Remember to put them at 90 deg to the first row (at right angles to the first row). Ensure that your edges are even and as square to each other as possible.

Step 6
Now place your coaster under a pile of tiles, bricks, or something heavy. Make sure that what you place onto your coaster will not stick to the glue; that is why I use a floor tile. Leave the coaster to stand as per the drying instructions on the side of your bottle of glue.

Step 7
After leaving my coaster for 24 hours as instructed now I am ready to sand the coaster. Following the grain of the coaster keep sanding till you have a smooth even finish.
Step 8
You can now varnish your coaster, or leave it raw and just apply a little wood oil to the surface to seal it and feed the wood.