

Upcycled Chipboard Pigeonhole Box
Step by step instructions showing you how to make your own pigeonhole box using upcycled chipboard, presented by Crafty Corner
For any questions contact us via emailFor this recycling craft, we turned a few old chipboard offcuts and upcycled them into these useful recycled pigeonhole boxes.
Pigeonhole boxes are quite easy to make, and make great storage containers for all your bits and bobs. We made a number of these pigeonhole boxes by recycling chipboard and use them to sort and store all our recycling, so that when we find the right upcycling idea, it is easy to reuse and recycle our household waste materials into a new upcycled product.
These boxes are super handy for storage, as they can easily be stacked on top of each other. Small boxes can easily fill a small space on a shelf in the garage, while very large ones can literally be turned into very useful room dividers! Follow these easy step by intructions and make your own!

In this project we will be making boxes that are 150 x 150 x 150mm. It is quite easy to make pigeonhole boxes that are smaller or larger, simply read through the following step by step instructions, adjust your measurements accordingly and soon you will have your own upcycled pigeonhole box in no time!
What you will need:
- 5x pieces of chipboard, minimum 150 x 196mm
- Saw
- Nails
- Hammer
- Set square Optional:
- Table saw
- Nail gun
Safety notes
- Please make note of the following etiquette when working with power tools, especially table saws:
- Wear safety goggles, this is particularly important when cutting chipboard as the machine throws up a lot of tiny chips
- Make sure that you have a guide, plastic handle or a piece of wood. You will need this to push the wood past the blade when working very close the the cutting edge
- If you are using a hand held circular saw, goggles are a must
- NEVER remove the blade guard when cutting thin bits, even if it is frustrating, rather find a larger piece.
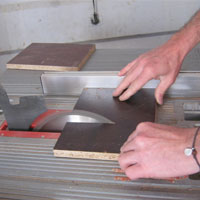
Step 1
Set your table saw to the maximum size you will need for this project i.e. 196mm.

Step 2
Select two chipboard pieces that are at least 196mm X 150mm and trim the one edge to 196mm. Once you have cut your first two pieces, mark the edge you just cut to ensure you do not trim the wrong side on the next step. Use a saw guard when cutting if you need to.


Step 3
The important thing to remember is that two of the pieces we have to cut must be bigger so that they fit over the edge of your 150mm square back. The exact size must be double the thickness of your offcuts, in this example 23mm. Double 23 and you get 46mm, hence the size of our board: 150mm + 46 = 196mm.
Step 4
You can now set the table saw to 150mm. Take the two pieces you have just cut and now trim the other edge to 150mm. This should leave you with two chipboard pieces that are 196mm x 150mm.

Step 5
Cut the remaining three pieces first on one side, and then turning them 90 deg and cutting the other edge. This should now give you three pieces of 150mm x 150mm, and two longer pieces from the step above.

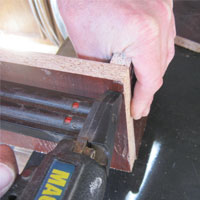
Step 6
Take one of your 150mm square pieces and one of your 196mm pieces and hold them at right angles. The 196mm board should rest flush on the edge of the 150mm board.

Step 7
Nail along the edge, I like to start with one nail at the top, I then re-align the bottom edges, nail these together and then insert a final nail in the middle.

Step 8
Take the other 196mm piece and nail it along the opposite edge as we did in the above step, nailing, top, bottom and middle. You should now have a "U" shape.

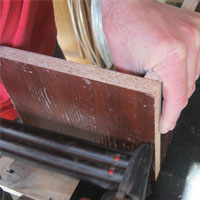
Step 9
Now insert what will become the back of the box. You will notice in the picture that the 196mm edges stick exactly 23mm beyond the edge of this board. Using the same process as above, nail this board in place.


Step 10
Turn your almost complete box and lie it on its back. Insert the final piece of recycled chipboard and nail it into place.


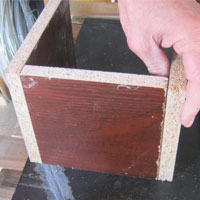
Step 11
Congratulations! Your upcycled pigeonhole box is now complete, and ready to be used as handy storage space.