Complex silicone mould
Step-by-step on how to make a complex silicone rubber mould, presented by Crafty Corner
For any questions contact us via email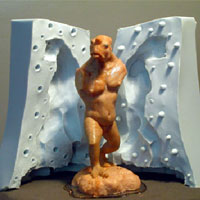
A good clean mould is a sculptor's best friend.
If you are a sculptor and plan to make money as a sculptor, then you need to learn how to create moulds. When you have the ability to create moulds, you have the ability to create multiple copies of your creations. Once you have your mould you also have the ability (and flexibility) to reproduce your sculptures in many different ways.
You can cast your sculpt in plaster, stone, plastic, wax (for bronze copies), resins, and many more materials for a huge variety of applications.
In this tutorial I'll be moulding a little troll sculpture that was created for this purpose. The troll was sculpted in 3 separate pieces (body, left arm, and right arm) so that they can be moulded separately and assembled later. I'll be moulding this sculpture in silicone RTV moulding rubber. One thing that I'd like to stress most of all is- it's very important to create clean neat moulds. Sloppy moulds will work sometimes, but they will never last.
Before you begin
Before you start on your mould it is very important to select where your parting line will be.
We're making a 2 piece mould here, and we need to decide where the seam for that mould will be. The 2 pieces of the mould should be able to open and close as cleanly as possible and the seam should be as straight and level as possible.
Think about how you will be casting materials into the mould and the best orientation for casting into the mould. You need to find the best place for your pour spout and watch for places that might catch air bubbles. Sometimes this will be a no brainer, but other times you will need to be very careful about where you place your parting line. This will become second nature to you with experience, and you will start planning for moulds before you even start your sculpture.
Laying up your clay
Before you start moulding your sculpture, it is a good idea to seal it. I sprayed down my little troll here with clear coat (found at any hardware store) and let it dry before starting to mould.
I also filled in the holes where the arms meet the shoulders, where the square stock piping from the arms inserted. The clay that I'll be using here is a water based clay (found at any art store).
During this part of the mould what I'm doing is sculpting the opposite side of the mould; remember that everything that is clay here will be silicone soon. I'm creating a clean cross section of my sculpture.
Start out by roughly laying in your clay keeping it as flat and level as possible following the contour of your sculpt. Try to keep everything as clean as possible and try your best to keep the clay off your sculpture. The reason that I sealed the sculpt is- if I do get clay on the sculpture (and I will) I can use a brush and some water and clean it off easily.
Remember, even if you are as clean as possible, clay is still sitting against the back of the sculpture and that clay will need to be cleaned off eventually, so seal your sculpt before you begin.
Smoothing out your clay
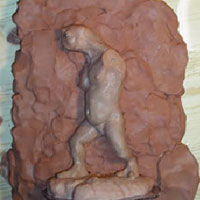
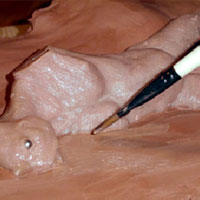
Once you have roughed out your clay, grab yourself a tool to smooth it out and make sure that the clay is going right against the sculpture. You want the water based clay to be right up against the sculpture (no gaps allowed).
You can see in the picture below that I'm making the clay as level as possible and it comes right up against the sculpture. You can also clearly see (picture below) why I sculpted the arms to be separate pieces. If the arms were attached the 2 mould pieces could not be parted without cutting the silicone, because the right elbow is below the armpit. It Is Important to be as precise and neat with this step as you can. If you are sloppy with this step you will end up with a sloppy mould.
Water and a brush
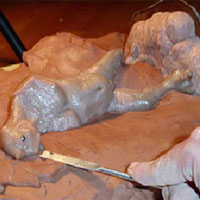
Next go in with some water and a brush and smooth out your clay even more, especially up against the sculpture. Here is where you define a really clean parting line.
If you get some clay on your sculpt just rinse it off with a clean brush and some water. A clean parting line is very important because once you get to casting your sculpture you are going to have a seam line to clean up (on your casting), and the smaller that it is- the easer it will be to clean up. A neat and clean parting line will give you a good seam on your castings.
Mould keys
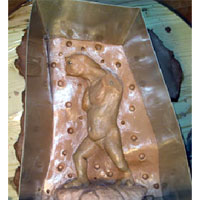
Once you have your clay all set up the next thing to do is add mould keys. Mould keys are important because once you close your mould everything needs to line up perfectly. Your mould keys must all be going in the same direction even if the mould surface is not.
You can see on the picture to the left that all the key holes are going straight up and down even in places where the mould is at a slant (like on the left leg). This is important because you need to be able to close this mould, and if the keys are going in different directions it would be very tricky to close.
For my key holes I used the back of my brush and pushed it into the clay about 1/4 of an inch. The key holes are relatively close to the sculpture so that the parting lines by the sculptures edge line up perfectly on the finished mould.

Adding mould walls
You can build up your mould walls with clay if you wish, but I like my moulds to be very clean with hard edges. I used aluminium roofing sheeting (found at any hardware store- sold by the roll) for my mould walls.
Aluminium sheeting is very easy to cut and bend into any shape that you may need. You can see on the picture to the right that I created 2 pieces from the sheeting and attached the pieces with hot glue. I pushed the sheeting down into the clay very carefully so as to not warp my clay lay-up or mould keys.
You can also see that the bottom piece of sheeting is very snug up against the base of the sculpture. I will be casting this sculpt by pouring into the base of the sculpture and I need that part of the mould to be open. Once my mould walls were all set up, I lightly sprayed the clay with clear coat. Once I pour this side of the mould and the silicone sets I am going to remove the clay, and sealing it helps.
Before moving on to the silicone pour- double check everything. Check all around your sculpt and make sure that the clay lay-up is right up against your sculpture and is clean. Check that your mould keys are all straight up and down. Check your sculpture and all its detail and be sure it is clean and clear of any clay residue.
Finally, wrap all your clay on the outside of the mould with saran wrap so that it doesn't dry. All this clay will be removed later and trust me, you do not want to be removing hard clay (unless your some kind of sadist that is).
If everything checks out then move on to the next step; this is your last chance to fix anything before it becomes permanent (in silicone).
Pouring silicone
The silicone that I'll be using for this mould is RTV 555. Most silicones come in 2 parts- the base silicone, and a catalyst (to harden the silicone).
Weigh out your silicone (I use a digital scale- they are fairly cheap) and mix in your catalyst at 2%.
Once your silicone is thoroughly mixed it is advisable to de-air your silicone in an evacuation chamber to remove all the air from the silicone. However, If you (like myself) do not have an evacuation chamber (they are not very cheap!) use the high pour method.
The high pour method is when you stand high above your sculpture and slowly pour a very thin stream over your sculpt. As you are pouring using the high pour method most of the air bubbles get stretched out of the silicone.
Just so you know, de-aired silicone will always be stronger but the high pour method gets the job done.
Working silicone into the mould
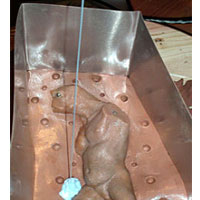
When pouring silicone over a sculpture it's very easy to get trapped air bubbles against the sculpture's surface (usually in undercuts and small indented areas). To avoid this, I cover my entire sculpture with a thin layer of silicone, and use an air compressor (or canned air, pictured below) to blow the silicone into all the detail and break those air bubbles apart.
Be careful to not blow too hard on your sculpt; you don't want to accidentally separate the clay seam line from your sculpture. Another option would be to apply a thin layer of silicone to your sculpt and clay surface with a brush. Once you are sure that you got the silicone into all your sculptures detail (this includes all the key holes for the mould), continue to finish your pour using the high pour method.
Side 1 finished
Here below is our finished side one. Now we get to sit and wait for our silicone to cure, usually 6-8 hours. You will know when your silicone is fully set when you can push on it without leaving any indentation in it.
I usually just wait to the next day before starting on side 2. In case you didn't earlier, remember to cover up that clay with saran wrap. Now go get a burger, or better yet start up another sculpture while your silicone sets.
Remove the mould walls
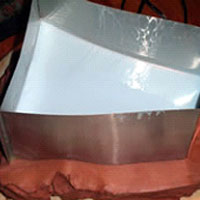
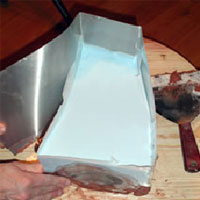
Once your silicone has fully cured carefully cut away the clay from outside of the aluminium mould walls, and peel back the aluminum walls from the silicone surface.
If you made aluminium walls (like I did) don't throw them away yet, you will use them again for the opposite side of the mould. If you built your mould walls out of clay then you will need to do that again pretty soon.
Remove the clay
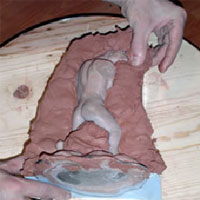
Flip your mould over and carefully begin to remove the clay from both your sculpture and your mould surface. You want to be very careful here because you do not want to accidentally pull your sculpture out of the mould (just your clay lay-up).
Your sculpture is now half embedded in silicone and the silicone should hold on to it fairly well, but if you are not careful you can pull your sculpture out of the silicone. If you do pull your sculpture out of the silicone it can be very tricky to put it back in precisely, and your finished mould will suffer for it. You can also see why we wrapped the clay in saran wrap.
If the clay that we are removing here was allowed to harden, this step would give you nightmares (trust me, I've had a few).
Clean sculpture & mould surface
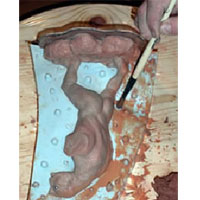
Once you have all the clay removed from your sculpture and mould surface, you need to clean the area off. If you sealed your sculpture before moulding it this step will go very quickly.
Get yourself a brush and some water and remove any clay residue from your mould surface and your sculpture. Pay particular attention right up against your sculpture. Check that all your sculpture's detail is clean and that there is absolutely no clay residue left anywhere.
Releasing your mould surface
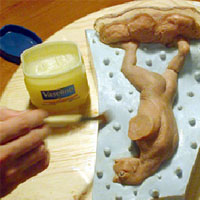
Once your mould surface and sculpture is fully clean you need to release your silicone surface.Silicone bites to itself like a rabid dog in November; if you don't release your silicone you will never get this mould open.
Vaseline is the perfect mould release. Using a brush, apply a very thin coat of Vaseline to the entire mould surface including the outer edges of the mould. Once again, make sure that the silicone is fully released up against your sculpture, and that you don't leave any large brush strokes on the surface.
After you have released your silicone surface check your sculpture and make sure that you didn't accidentally get Vaseline into the detail of your sculpture; if you did, clean it out with a clean brush.
Replace your mould walls
Another reason that I like making my mould walls out of aluminium sheeting is that I don't need to re-make my mould walls for pouring up side two; I can use the same ones I made for the first side.
I use clay on the outside of the mould walls to push them up against the mould surface. I then re-attached the two pieces with hot glue. If you built up your mould walls with clay then you will need to do that again here.
Try your best to not allow for any gaps between the mould walls and your silicone; however don't allow the mould walls to compress the silicone in order to accomplish this. This is why you used Vaseline on the outer edges of your mould, just in case some silicone gets between your mould walls and the edges of the first side, they won't stick.
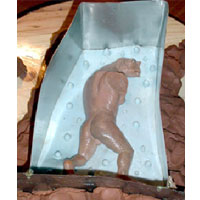
Pouring side 2
Just as you did with side one, weigh out your silicone and using the high pour method cover the surface of your mould and sculpture with a thin layer of silicone.
Use an air compressor (or canned air, on the left I'm using my airbrush) to blow the silicone into all your sculpture's detail, and remove any air bubbles trapped against your sculpture's surface. Use your air in light touches so as to not blow silicone between your sculpture and the first side of your mould (this would be bad, and your seam line would be toast).
Again, if you don't have an air compressor use a brush to apply your silicone into all your detail. Once your detail is properly covered, finish off your pour for the second side of your mould.
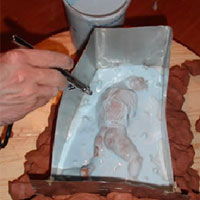
Opening your mould
Once the second side of your mould has fully cured, remove your mould walls.
Go around your finished mould and slowly part your seam line all the way around. Then begin to open your mould very carefully so as to not disturb your sculpture too much. If anything went wrong with your mould you are going to need that sculpture to be intact so that you can try again, and if you are not careful (opening your mould) you can break your sculpture.
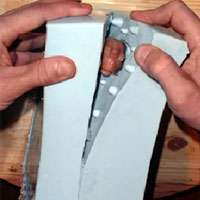
Cleaning & storing your mould
Once your mould is opened give it a good cleaning. I usually scrub it down with a brush and acetone to get rid of any residue left behind by the clear coat that I used to seal the sculpture and clay, and the Vaseline used to release the silicone.
As far as storing your moulds- if you want your moulds to last they should always be kept clean. Store them in a cool dry place and always store your moulds closed and unclamped. Silicone moulds can warp over time if you keep them clamped or opened.
Moulding the arms
I moulded the arms the exact same way that I moulded the body but I just thought I'd quickly show you the setup for them (below). They were moulded in two pieces and once the moulds were finished I cut the pour spouts into the silicone with a razor blade.
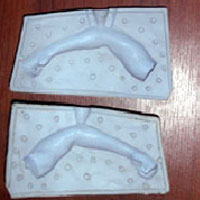
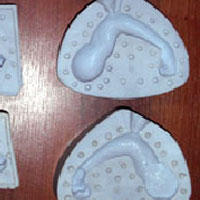
And that folks is how to create a beautiful clean silicone mould. If you were neat and clean through all the steps in this tutorial, your moulds will last you a long time and give you a good seam on your castings.


