

Glitter Decorated Easter Egg
Easy step by step instructions showing you how to make your own glitter decorated Easter egg, presented by: Crafty Corner
For any questions contact us via email
This is a fun and easy Easter craft project for kids of all ages. Kids just love playing with glitter and glue, and in this easy step by step Easter craft project, they will make and decorate their very own Easter eggs!

What you will need:
- Polystyrene egg shape
- Glitter (we used three colours)
- Cold glue
- Small squeeze bottle
- Cardboard box or a tray
- Felt tipped marker pen
- Skewer stick
- Work surface
Read through all the instructions first before starting this craft. Make sure you have everything you will need at hand and that your working area is clean and tidy. Cover your surface with plastic or brown paper if you want to.
Step 1
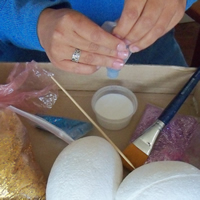
To start, we are going to show you how to transfer the cold glue from a tub into your squeeze bottle.
Compress your squeeze bottle with your fingers, forcing all the air out. Then stick the opening face down into your glue tub and slowly release the pressure, allowing the bottle to slowly suck up the glue. Repeat once or twice to fill the bottle.

Step 2
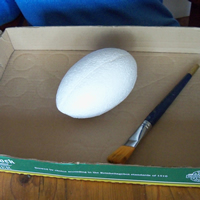
Now we can start getting creative!
Put the cardboard box or tray in front of you, with the polystyrene egg shape, paintbrush, glue (in the squeeze bottle) and skewer stick. Insert the skewer stick (point first) into the bottom of the egg, the bottom is the rounder, less pointy side of the Easter egg.
Step 3
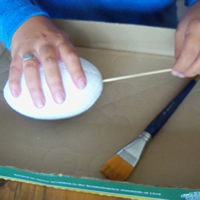
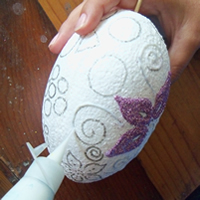
Using the felt tipped marker pen, draw patterns and designs onto the polystyrene Easter egg shape.

Step 4
Now, before we start working with the glue, it is best to work in only a small area at a time. Decide where you would like to begin and what colour glitter you would like to use, and then use the squeeze bottle to trace the design in glue.

Step 5
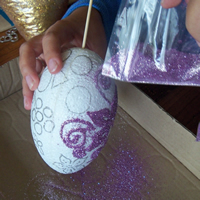
Holding the Easter egg by the skewer stick, make sure that you are working over your box or tray, and then liberally sprinkle glitter in your colour choice over the glue.

Step 6
Shake off the excess glitter, catching it in the box.
Continue tracing the next bit of your design that you would like in the same colour, and then repeat the process, sprinkling glitter over the traced design and then shaking the excess glitter off into the box or tray.
Step 7
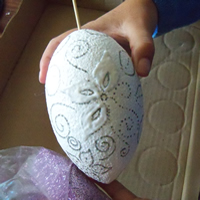
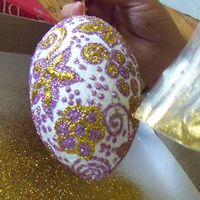
Keep going until you have completed the pattern for the first colour (purple).
Step 8
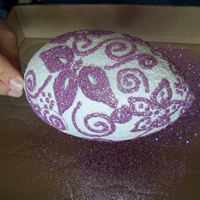
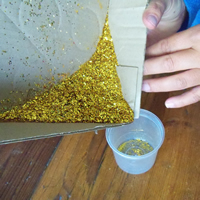
Now you can pick up the box and tap it, so that the glitter runs into one of the corners. Tip it to funnel the glitter back into the container.
Step 9
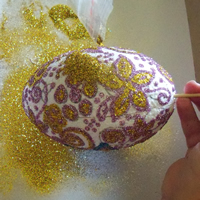
Once the glue has dried properly we can start decorating the egg shape with the second colour (gold).
Again, holding the egg shape up by the skewer stick, use your other hand and squeeze bottle to trace glue out onto the egg. We are going to start by filling in the centre of our flowers.

Step 10
Continue working in sections, first tracing in glue, then sprinkling the glitter, and then shaking the excess off into the box.
Step 11
Once you are finished with the gold glitter, tip and tap the tray to bring the excess glitter to a corner, and then funnel it back into the container.
Step 12
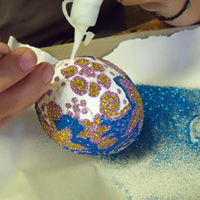
Having allowed the second colour of glitter and glue to dry thoroughly, you can fill in the back ground with your third colour. Carefully expel glue from your squeeze bottle into the unfilled areas and liberally sprinkle and shake off the excess of the third colour (blue) into each section as you go.

Step 13
Once you have finished decorating your egg, prop it up by pushing the skewer into the cardboard tray and allow to dry.

Step 14
All done! Now you can use the Easter egg to decorate your home or shop for Easter!
For a further finish, you can spray the egg shape with a clear lacquer to protect the egg shape and hold the glitter into place.
Step 15
Redo all the steps and make another Easter egg using different design patterns and colours!
