 Crafts
 Kids
Kids D I Y
D I Y Recycle
 Designs
 Subscribe
 Search
Related Products
Silicone moulds
Silicone products
Painted Candles
Step-by-step on how to make a Painted candle, as presented by: Crafty Corner
For any questions contact us via email

What you need to make a Painted candle:
- Acrylic paint – black, mustard and brown
- Paint brushes
- Sponge
- Stove plate
- Metal container or pot to melt wax in
- Container for water to wash your brushes
Step 1
Dip your sponge into your mustard coloured paint and gently dab it all over your candle or candles. I would recomend painting more than one candle as they take a while to dry, and sitting and waiting for one candle to dry can get frustrating!

Step 2
Leave your candles to dry for at least two hours between coats or applications. The sponge technique creates a rough texture on your candle. This is what it should look like.

Step 3
Use a medium size paintbrush for painting the leopard spots with your brown paint. We're not so much painting as putting thick blotches onto the mustard coloured paint.

Step 4
Leave your candle to dry. The thick blotches of brown paint create even more texture on your candles

Step 5
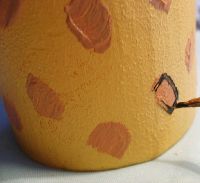
Use your black paint and a thinner paintbrush to outline each leopard spot on your candle.

Step 6
Once dry, your candle is ready to be over-dipped with clear wax to embed the image into other candles. Don't soak the candle in the overdipping or the painted part will start to melt and fall off.


