Step-by-step on how to make a Sliced candle, as presented by: Crafty Corner
Suitable for kids and adults. For any questions Contact us, Crafty Corner
If you have young kids that want to make a candle this is a great project. as all the hot wax work can be done safely before you involve the young ones in making a candle. Great project for holidays.
Use up all your scraps of wax by making an easy to assemble sliced candle
What you need to make a Sliced candle:
- Wick
- Left over wax
- Thermometer
- Molds (floating candle type mold)
- Pigment to colour with
- A screwdriver or dril-lbit to drill small holes
The concept
When you are making candles you will often find that you have a little hot wax left over that you do not know what to do with. You find that you have to make space to melt more wax and need your container back. It is with this in mind that we started to look for ways to store wax in a ready to use form, or even make use of it without having to make an entirely new candle. So, the challenge was on…
Crafty Corner has found an easy way to store or use these little bits of wax that you have left over from a melt. It is such a simple solution, you’ll be able to make a candle in a matter of minutes! It almost becomes a good idea to make a little extra wax on purpose just so that you can make a few more slices and keep them handy.
Step 1
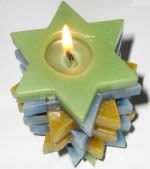
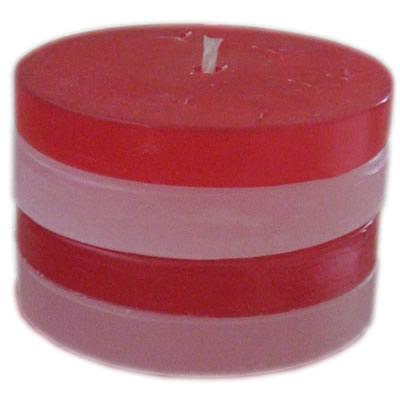
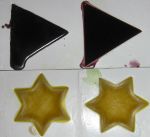
The mold should be ideally no more than 10mm deep. The best ones to use are those that are used for making floating candles.
Take the leftover hot wax and fill the moulds you have set aside, make sure you remember to check the temperature so it will not damage your moulds i.e. between 82 – 90 deg c.
Step 2
After allowing the wax to set you can remove the shapes from your mold and set it aside. When cooled you can clean off the edges with a craft knife.
Step 3
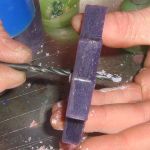
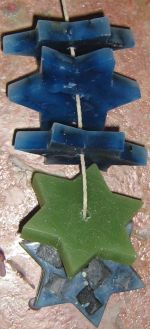
Once you have collected enough slices you can now assemble your candle. Take each slice that you have set aside and using a hot metal poker, thin sharp screwdriver or a drill-bit, make a hole in the centre of the slice just big enough for your wick to be threaded through.
Step 4
Tie a double-knot at one end of the primed wick so that it cannot be easily pulled though the hole you have made. Slide your slices down your wick till you have stacked at least 6–10 slices together.
Step 5
Standing the candle up so that the slices are all together, you can now finally trim the wick so that it is about 5 mm from the top of the last slice.
Your candle is now ready to use and enjoy.