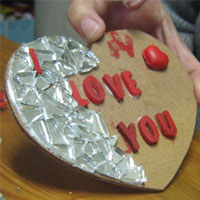
Mosaic "I love you" Heart
Step by step on how to make a mosaic "I love you" heart, ideal for Valentines Day, presented by: Crafty Corner
For any questions contact us via email

What you need to make a mosaic love heart:
All of these items are available from Crafty Corner.- Pre-cut heart blank
- Mirror bits
- Wood Glue
- Resin letters to spell "I love you"
- Two wheel cutter
- Red paint
- Thin paintbrush
- Tile grout
- Water

Step 1
Plan where you would like your letters and then glue them onto the board one-by-one. Also glue down any embellishments you would like to use, such as the small resin heart we are using. Once they are all stuck down, leave for about half an hour to dry.

Step 2
Once all your letters and embellishments are stuck down, paint them red using the paint and paintbrush. Don't forget to wash the brush with water when you are done. Leave to dry.


Step 3
Once the paint is dry and won't rub off, start by putting some glue along the edge of the mosaic heart board. It's usually better to start with the borders first - this gives the border more time to dry and will help keep the other mosaic pieces in place.

Step 4
Place broken mirror bits onto the glue, press and hold for a few seconds to make sure it sticks. Try to get the pieces very close together, and make sure that no pieces go over the edge. Just like colouring in a picture, you want to keep it all inside the lines. Use the two-wheeled cutter to cut the bits of mirror to the desired size and shape.

Step 5
Once the border is done, place some glue on the inside, and start gluing tile bits inside the border.


Step 6
Continue gluing and sticking pieces down. Our mosaic Valentine's heart is now starting to take shape!

Step 7
Continue until the entire surface of the board is covered, and then leave to dry overnight.

Grouting
Once the glue has properly dried overnight, follow the instructions for grouting from Step 7 on the kids mosaic heart project to complete the I Love You heart - a great gift for Valentines Day.


