

Mosaic Heart
Step by step instructions showing how to make your own mosaic heart, presented by Crafty Corner
For any questions contact us via emailThese mosaic hearts are simple to make and are ideal for kids aged 4+, though boys and girls under 10 will need help from an adult. This is a great way to spend a lazy Saturday afternoon!

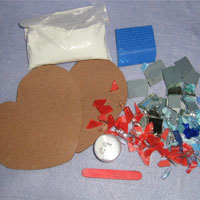
What you will need:
- Mosaic blank
- Mirror broken into small bits
- Glass tiles broken into small bits
- Tile grout
- Glue
- Ice-cream stick
- Piece of foam, thick carboard or soft plastic
Step 1
The first thing to do is to get your blank, mirror & glass bits and glue ready.
Step 2
Now you can start planning how you want the heart to look. Some people like putting one colour all around the outside, or you could make one half of the heart one colour, and the other half a different colour. Another option is to just let your instincts guide you and make it all up as you go along!
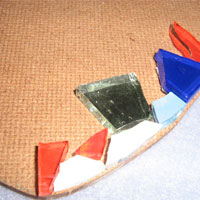
Step 3
Once you have an idea of what you want to do, you can put a little glue on the edge of the blank. You really don't want any gaps or spaces along the edge, or pieces that stick out over the edge, that's why we're starting with the edges first. We used an ice-cream stick to spread the glue. Try not to leave big spaces between the pieces, stick them very close together.

Step 4
With the glue in place, you can now start sticking down the mirror and glass pieces. Each time you put a piece down, press it firmly for a couple of seconds to make sure it sticks properly.
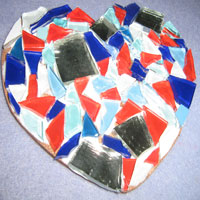
Step 5
Once the outside of your heart is done, you can start filling in the inside. Don't cover the blank board with glue, rather just put a little glue on a small section at a time, about the size of a R5 coin. This is to stop the glue from drying if you take too long. If you have to put fresh glue on top of dry glue, your mosaic won't end up with a level finish.

Step 6
Keep going until you've covered the whole board with tiles or mirror bits. Make sure that you've filled in all the big gaps. Once this is done, leave your mosaic to dry at least 30min, or overnight if you have the time.
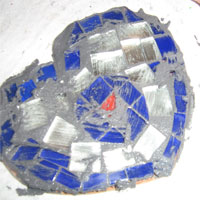
Step 7
Once the glue is dry, put some grout into a small container. Carefully add a few drop of water and stir thoroughly with an ice-cream stick.

Step 8
Keep adding water, a drop at a time and keep stirring until the consistency is a little softer than toothpaste.

Step 9
Using the ice-cream stick, pour/dump enough grout onto the heart to cover it, and then spread it.


Step 10
Using the piece of foam, spread the grout around to cover the entire mosaic. Try and work the grout into all the little spaces inbetween the mirror bits and glass mosaic tiles


Step 11
Once the grout is spread evenly over the entire surface and you've scraped off the excess with the sponge, leave to dry for 1-2 hrs.
Step 12
After 1-2 hrs, take a damp cloth or kitchen sponge and gently wipe the surface of the mosaic, and then set aside overnight.
Step 13
Once the grout is completely dry, take a dry cloth and rub it, any excess grout will powder away and leave you with a beautiful, shiny mosaic decoration for your bedroom.
