

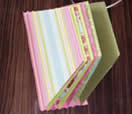
Paper Handbag Album
Step by step on how to make a paper handbag album, presented by Shoestring Scrapbooking:

For any questions contact: Canica

What you need to make paper handbag album:
- Double sided tape
- 12 sheets of 12 x 12cm paper
- Scissors
- Pencil
- Chalk
- Thin card for templates - template
- Ribbon
- Embellishments for handbag flap (flower)

Read through all the instructions first before starting this craft
Step 1
For the covers, trace the two template pieces for the cardboard measuring: top , 10cm & bottom, 20cm, and cut these out using a scissors or sharp craft knife.


Step 2
Trace the spine and cut it out. The spine should be 1 piece of card measuring 20cm x 4cm, and the width 10,5cm.
Step 3
We are now going to make the inner pages for the album and you will need 8 sheets of 12 x 12 paper. Use your cover templates, put two pieces together with the smaller sides touching each other on 1 sheet of paper and trace around the outside of both using a pencil. You need to repeat this step to make 8 sheets.
Step 4
Once we have traced all 8 pages we need to cut them out using a scissors and fold them in half.
Step 5
If you like you can chalk them to finish them off, and then put them one side. Chalking is a simple technique that adds dimension to scrapbooking projects.

Step 6
To make the cover, align the 2 covers and spine next to each other with the spine in the middle. Leave a 5mm gap between the covers and spine.
Place them in the centre of a single sheet of 12 x 12 paper and glue in place. You need to use scrappers glue, as it is acid free. Creative Scrapping Scrappers Glue or KI Glue are good choices.


Step 7
Trace a 1cm border around your cover using a pencil and cut out.
Step 8
Cover the cover by folding your paper over and stick it down with double sided tape. We used 4mm purple turtle double sided tape.
Step 9
Now we are going to make a concertina type album. Cut 1 piece of plain cardstock measuring 20cm X 16cm and score at 1cm intervals. Fold on each score, this is your concertina file for the album pages.

Step 10
Put a section of double sided tape down onto each fold of your concertina file and stick your pages down, leaving one fold on each side. Stick the inner pages on the concertina folds, sticking one sheet per fold.

Step 11
Before sticking your concertina file onto the spine, cover the inside of your album.
NOTE: If you want to give your handbag ribbon handles, stick your ribbon down before you cover the inside of the album.
Step 12
Use double sided tape on the two last flaps of the concertina to stick the concertina onto the spine once the cover is done.

Step 13
Cut one album flap measuring 12cm X 7cm using paper of your choice. Finish off the flap with embellishments of your choice and then stick the flap to the back of the handbag using wood glue.
NOTE: You can use Velcro for the flap so that it stays closed.


Step 14
Your handbag concertina album is now complete.