

Mothers Day Card
Step by step instructions on how to make a Mothers day card, as presented by:

For any questions contact: Canica

What you need to make a Mothers day card:
MOM word album kit, available from Shoestring Scrapbooking
The kit will include:- MOM word album
- 4 12“ x 12“ papers
- Transparency
- Flowers
- Metal butterflies
- Envelope template
- Brads
- Metal hearts
- 3m ribbon
Extras you will need
- Double sided tape
- Small beads
- Craft knife
- Cutting mat
- 1 x Quote or poem
- Hole puncher
- Scissors

NB. Make sure you craft knife blade is sharp and that you cut off the white strips on your 12 X 12 paper before you start.
Step 1
Choose which piece of paper you are going to use to cover the O. Place your blank on the paper so that the entire piece is on the page. Then you are going to use a pencil and trace the middle of the O, cut it out and put it aside.
TIP:The reason you do this first is because once you have made the shaker box you cannot trace the centre of the O so it makes it easier to cover.

Step 2
Now you are going to stick down your photo on the back of the O with double sided tape (use a 10X15cm photo). Make sure the photo is correctly placed and is facing forward.
Step 3
Turnover and add a few small beads (put beads on top of photo). Choose colors that are similar to the picture so as not to contrast to much and only chose one type of bead or you loose the impact of your picture.
Step 4
Cut out a piece of transparency to cover the top of the O. Cut the transparency about 1.5cm bigger than the middle of the O. Use a good craft glue to stick it down and leave it a while so that it dries properly.
Step 5
You are now going to cover all the letters in MOM – front and back. Your 4 pieces of paper will be enough to cover them all.

This is how I covered mine -
The 1st M in Mom (front) and the last M in mom (back) I used the same piece of paper. The 1st M in Mom (back and the front of the O I used the same piece of paper The back of the O and the front of the last M I used 2 pieces of the same paper to cover them.
NB. Cover one side at a time.Cover your wooden letter with double sided tape and stick it down to the back of your paper.
Step 6
Place it on your cutting mat and with your sharp craft knife start cutting along the edges (you are basically tracing it with the craft knife).
Step 7
Once you have done the one side use your hole puncher to mark the holes on the side of the album and then you cover the back the same way, and mark your holes again.
NOTE: You do not need to make your own holes as the wooden album has holes in already. This is why you cover one side at a time.
The easiest way to make the hole in the paper is with a scrapbooking hole puncher – this can be found at any scrapbooking shop. Hole punchers are normally used for eyelets, but they can be use for various things and are a good investment. You can use a craft knife to cut the holes in the paper – but this has to be done with precision
You are going to repeat this process for the covering of the whole album.
Step 8
Once you have covered all the letters, chalk the edges.
NOTE:Chalking is a technique used to add dimension and color to paper. I love chalking everything because it finishes off the project.

Step 9
Embellish and decorate the album.
Before getting started on embellishments maybe read through the NOTES on what is the best adhesive materials for each application.
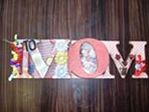
1st M in MOM, on the album I did, I used the word To using smallish lettering. You can say to, my, the best or whatever you would like to say. But make sure you use smallish lettering so that it fits properly. You can use ribbons, flowers and tiny metal charms to decorate – the 1st M cannot be decorated with photos or poems.
O in MOM, I used a poem that I stuck down to plain card stock and I then put two brads. Brads are like split pins – you push them through the paper and open them at the back. I then stuck down 2 flowers.

Back of the O, In the rounded part I used a large flower. Then 3 photos the sizes 4.5cm X 6cm. You can use a sticker with a quote or saying, or dymo tape with a personal message to Mom. DYMO Machine and Tape – This is what they used years ago for labeling. It can be bought at a big stationery shop or a scrapbooking shop.
The last M in MOM, You can either decorate it with photos like the back of the O or if you want to add quite a few photos then you can make little pockets or envelopes. I used three envelopes and there are about 10 small photos measuring 6 x 4.5 cm in each envelope. On the end of the M I used ribbons and different flowers to decorate. You can personalise this by handwriting quotes and sayings throughout the album.
Step 10
Cut ribbon to thread through the holes to keep the book together. Remember to tie the ribbon loosely so the book opens easily.
