A decorative metal project using traditional embossing and finishing techniques, for more information contact us
This project guides you through the process of creating a handcrafted pewter light switch cover. Workign with pewter to build raised detail, supporting the design with wax backing and patina to finish.
The project is detailed and tactile, rewarding careful, methodical work. While pewter is forgiving, the quality of the final result depends on patience and controlled pressure.
Presented by: Crafty Corner
Skill level: Intermediate
Age suitability: 13+ with adult supervision
Supervision note: Involves hot wax, sharp cutting tools, and chemical patina
Materials and tools
Base materials
- Light switch covers
- Pewter sheet
- Felt
Embossing and detailing tools
- Fine ball tool
- Soft paper pencil
- Cutting mat and craft knife
Finishing materials
- Baby oil
- Pewter patina
- Beeswax
- Brasso
- Clear lacquer spray varnish
Mounting and protection
- Pewter glue
- Masking tape
- Gloves
Cleaning and polishing
- Batting
- Soft polishing cloth
- Methylated spirits
Before starting, read through all steps carefully and prepare your workspace. Good lighting and a clean, stable surface will make the process easier and safer.
Instructions
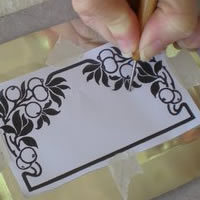
Step 1: Transfer the design
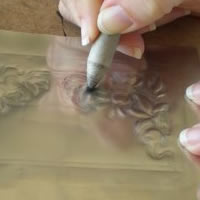
Place the paper pattern onto the pewter sheet. Working on a piece of felt, trace the design using a fine ball tool.
Apply slightly more pressure than you would when writing, but avoid scratching or gouging the metal. This side becomes the right side of the design. When you turn the pewter over, the pattern should be visible on the wrong side.
Remove the paper pattern once the outline is clearly transferred.
Step 2: Lubricate the pewter
Rub a very small amount of baby oil over both the front and back of the pewter. This reduces friction and allows your tools to glide smoothly across the surface.
Only a light sheen is needed — too much oil can reduce control.
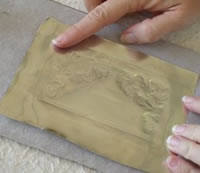
Step 3: Begin embossing from the back
Place the pewter on felt with the wrong side facing up. Using a soft paper pencil, gently hollow out the areas you want to appear raised on the front, such as leaves or decorative motifs.
Work slowly and build depth gradually using repeated light strokes rather than heavy pressure.
Step 4: Refine the raised areas
Turn the pewter over to the front side and place it on a smooth, hard surface. Lightly flatten the surrounding areas to sharpen the raised shapes.
If more depth is required, turn the pewter back over and continue hollowing. Repeat this process until the embossing has a balanced and clearly defined form.
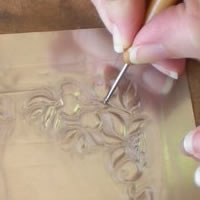
Step 5: Re-define the design
Once the embossed areas are complete, place the pewter on a flat, hard surface and re-trace the entire design using a fine ball tool.
This step, known as re-defining, restores crisp outlines and enhances clarity after the metal has been shaped.
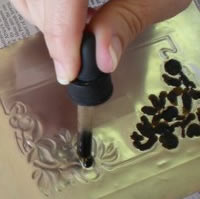
Step 6: Strengthen with beeswax
Heat beeswax on a hotplate until it is smoking hot. Using a glass dropper bottle, carefully fill all the hollowed-out areas on the back of the pewter with hot wax.
Allow the wax to cool and set naturally.
Take care during this step — hot wax can cause burns.
Step 7: Clean the surface
Put on gloves. Using a piece of batting dampened with methylated spirits, clean the front surface of the pewter to remove any oil, residue, or wax traces.
Ensure the surface is clean and dry before applying patina.
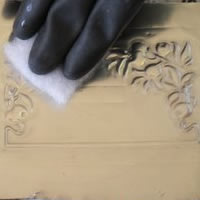
Step 8: Apply patina
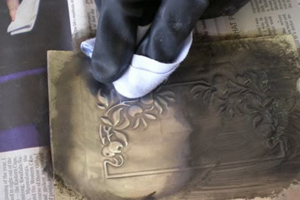
Still wearing gloves, apply pewter patina using a clean piece of batting. The pewter will turn black almost immediately.
Allow the patina to sit for approximately three minutes to develop fully.
Work in a well-ventilated area when using patina.
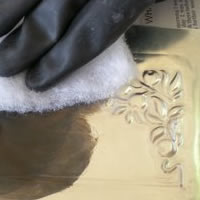
Step 9: Polish for contrast
Using a clean, soft cloth, polish the surface with Brasso until the raised areas return to a bright silver finish.
This polishing creates contrast between the raised and recessed areas, bringing out the embossed detail.
Step 10: Mount the pewter to the switch cover
Apply pewter glue evenly to the light switch cover. Position the pewter carefully and press it flat against the surface.
Fold the excess pewter neatly over the edges to the back of the switch cover.

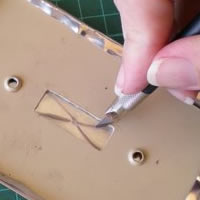
Step 11: Final finishing
Place the piece on a cutting mat. Using a craft knife, carefully cut an “X” in the pewter where the switch opening is located and fold the sections to the back.
Once complete, spray the pewter with a clear lacquer varnish to protect the finish. Allow it to dry fully before installation.
Your pewter light switch cover is now ready to be installed.