
Step by step on how to make a bedroom door name plaque, presented by Crafty Corner
Suitable for young adults and older. For any questions contact us via email

What you need to make a bedroom door plaque:
- Super Wood Plaque
Ensure the wood plaque is the right size for the name you have selected
We suggest using 7cm per letter spacing - PVA Paint
2 or 3 colours of your choice depending on your design of your bedroom door name plaque
You will need at least 250 ml for the colour of your background - Paint brush
- Wood glue
- Basic designs
For a boy’s room, use pictures of cars, or for a girls room try using flowers
Colouring books are always a good source to obtain pictures. - Super Wood Letters for each letter of the name you have selected as a door name
- Dala Hard Varnish
- Carbon Paper to trace the selected picture from the colouring-in book
- Pencil to trace selected colouring in picture
Read through the basic instructions on how to decoupage before starting with the craft: Basic Decoupage Instructions
Step 1
Remove any labels from your bedroom door name plaque. Lightly sand if required with 800 grit sand paper for a smooth finish.
Step 2
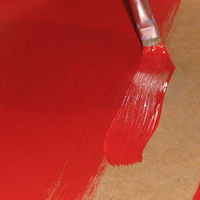
Paint the back of door plaque with a thin coat of paint and apply more thin coats as needed. It is better to do this than to apply one thick coat as we do not want to see the paint brush tracks. Leave to dry for approximately 2 hours.
Step 3
In the meantime, while waiting for the back of the door plaque to dry, start painting the back of the letters of the door name in an alternative colour. Contrasting colours always work well. Turn painted letters onto their front and wait to dry.
If choosing the colours lime-green or yellow, we recommend first painting the letters with white paint for better coverage and you will not need to apply multiple coats.
Step 4
When the paint on the back of your plaque is dry, start painting the front of the plaque as well as the letters of the name you have selected with 2 coats of paint on each item. Inspect each item when dry to determine a good finish. If you are not satisfied with the outcome, sand the items using 800 to 1000 grit sandpaper dipped in water and sand in small circles.
It is important to use water with the sand paper as this keeps the sand paper clean from clogging. The water binds with the paint and draws into the plaque and letters, filling the cracks and imperfections resulting in a smooth finish.
Be careful not to use too much water. We want the sandpaper slightly wet and not soggy. Too much water could warp the letters and destroy your door names.

Step 5
Give an extra coat of paint.
Step 6
Using the wood glue, paste the letters onto the plaque, making sure they are evenly spaced.
Step 7
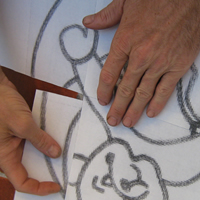
Using your carbon paper, gently place on the area you have selected to draw your basic design (coloring in picture). Secure the colouring-in picture in place with masking tape. Trace the selected picture on to the plaque lightly with a pencil. Ensure the correct amount of pressure is applied as you want to be able to see the picture but you do not want stubborn carbon lines on your plaque.
It is imperative never to leave masking tape attached to your plaque for more than 2 hours, the reason being once you remove the masking tape after 2 hours you will remove the paint and we do not want to restart the steps again.
Step 8
When you have traced your selected picture onto the plaque, paint the picture according to your requirements. If you see stubborn carbon lines that remain on your plaque you can remove them by painting that area with white paint, leaving to dry and then repainting with the selected colour. 
To decoupage picture onto your plaque you can do so by following the Christmas decorations step by step.
When completed and you are satisfied with your bedroom door name, give the plaque and letters a layer or two of Dala Hard Varnish. Leave to dry inbetween coats. Stick double sided tape to the back of plaque and hang up on your door.