A simple low-relief pewter project using surface detailing and patina
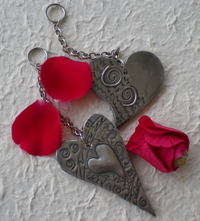
This project shows how to create a decorative pewter heart key ring using low-relief detailing rather than raised embossing. The process focuses on clean pattern transfer, surface contrast, and careful finishing, making it an accessible introduction to working with pewter.
The finished key ring is lightweight, durable, and well suited to gifts or small keepsakes.
Presented by: Crafty Corner
Skill level: Beginner
Age suitability: 10+ with adult supervision
Supervision note: Uses scissors and chemical patina; gloves recommended
Materials and tools
- Wooden heart blank
- Silver craft acrylic paint
- Lead-free pewter
- Masking tape
- Small embossing tool
- Felt or thin batting
- Pewter patina
- Brasso
- Soft polishing cloth
- Small piece of batting
- Pewter glue
- Scissors
Before starting, read through all the steps and prepare your workspace. Cover your surface and ensure good ventilation when using patina.
Step-by-step instructions
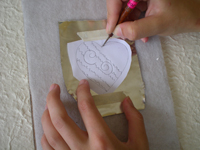
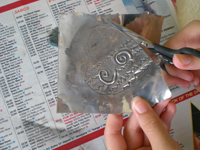
Step 1: Transfer the pattern
Secure the paper pattern onto the pewter using masking tape. Place the pewter on a piece of felt or thin batting and trace the design using a small embossing tool.
Apply slightly more pressure than you would when writing with a pen. The goal is to leave a clear outline without stretching or thinning the pewter.
Step 2: Remove the pattern
Carefully remove the paper pattern and masking tape. Check that the design has transferred cleanly and evenly before moving on.
Step 3: Apply patina
Put on gloves. Apply a small amount of pewter patina to a piece of batting and rub it gently over the surface of the pewter.
Work quickly and lightly. Avoid using too much patina or pressing too hard, as this can dull the surface unnecessarily.
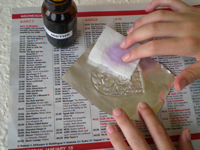
Step 4: Polish back the surface
Immediately polish the pewter using a clean piece of batting dipped in Brasso. As you polish, the black patina will lift from the surface, revealing the silver pewter again.
The recessed lines will remain darker, creating contrast that highlights the design.
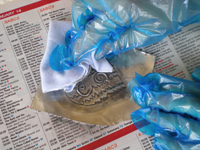
Step 5: Final polish and cutting
Once the surface patina has been removed, polish the pewter with a very soft cloth until it shines.
Using a fine pair of scissors, carefully cut out the pewter heart, following the outline of the design.
Step 6: Prepare the wooden base
Paint the wooden heart silver using craft acrylic paint and a paintbrush. Allow the paint to dry completely before attaching the pewter.

Step 7: Assemble the key ring
Apply pewter glue to the back of the pewter heart and press it firmly onto the painted wooden heart.
Allow the glue to cure fully according to the manufacturer’s instructions. Your pewter heart key ring is now complete.