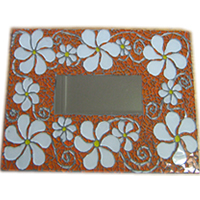
A decorative mosaic mirror using tile, glass, and grout
This project creates a decorative flower-shaped mosaic mirror using orange and white tiles combined with mirror pieces. The result is a bold, reflective wall piece that works well as a feature item in bathrooms, bedrooms, or creative spaces.
The design is playful and expressive, but the process requires patience and care — particularly when working with glass and mirror. Taking your time with placement and drying will make a noticeable difference to the finished piece.
Presented by: Crafty Corner
Skill level: Confident Beginner
Age suitability: 12+ with adult supervision
Supervision note: Involves glass and mirror cutting, sharp edges, and grout; eye protection and gloves recommended
Materials and tools
- Flower-shaped base board or mirror base
- Mosaic tiles (orange and white)
- Mirror pieces
- Wood glue or mosaic adhesive
- Two-wheel tile cutter
- Tile grout
- Water
- Mixing container
- Ice-cream stick or spatula
- Soft cloth or sponge
Before starting, read through all the steps and prepare your workspace. Mosaic work is slower than it looks and benefits from good lighting, a stable surface, and time between stages.
Step-by-step instructions
Step 1: Prepare the flower designs
Using your flower design template, select one basic flower shape. Make three copies of this flower in different sizes — large, medium, and small.
These will be used to create variation and movement across the board.
Step 2: Plan the full layout
Place the masonite board in front of you and plan the overall design.
Position:
- One large flower in each corner
- A medium flower between each large flower
- Two or three small flowers scattered between them
In the open spaces, draw flowing swirls to connect and intertwine the flowers. This layout stage is important for balance and spacing.

Step 3: Draw the petals onto the tiles
Using a pencil and carbon paper if needed, draw the individual flower petal shapes onto 5 × 5 cm white mosaic tiles.
You may use either a permanent marker or a whiteboard marker. Draw carefully and avoid touching the drawn lines, as smudging can distort the petal shapes.
If using permanent marker, note that most ink will wash off during grouting. Any stubborn marks can be removed later with methylated spirits.

Step 4: Cut out the petals
Cut out the drawn petal shapes using a two-wheel tile cutter.
For best control:
- Rest the edge of the tile between the cutter wheels
- Do not place the tile fully inside the cutter
- Chip away slowly along the drawn line
This method gives cleaner curves and reduces breakage.


Step 5: Cut enough petals
Continue cutting until you have enough white petal pieces for all the flowers in your design.
Lay them out loosely on the board to check spacing before gluing.

Step 6: Prepare the flower centres and background pieces
Cut orange mosaic tiles into small circular or rounded pieces for the centres of the flowers.
At the same time, cut additional small, irregular orange pieces to use later for the background areas of the mosaic.

Step 7: Begin gluing the flower design
Start by gluing the white petal pieces onto the masonite board. These are the largest pieces and are easiest to place first.
Once the petals are in place, glue the orange centre pieces and any additional orange petals around them.
Use thin slivers of white tile to form the swirling stems between flowers.
.

Step 8: Add the mirror
When the flower design is complete, glue the mirror into the centre of the composition directly onto the masonite board.
Leave a 3–4 mm gap between the mirror and the surrounding mosaic pieces to allow for grout.
Step 9
Step 9: Complete the background
Fill in the remaining background areas with the small orange mosaic pieces.
Use the smooth edges of tiles along the outer edge of the board to create a clean finish.
Step 10: Allow to dry and grout
Leave the mosaic to dry overnight.
Once fully dry, grout the piece following Step 13 of the Teddy Bear on the Moon project.
Grey grout was used in this example to ensure the white petals stand out clearly. If you choose different petal colours, white grout may be more suitable.
Step 11: Final result
Once the grout has dried and the surface has been cleaned, your white and orange mosaic flower mirror is complete and ready to display.