
A patterned polymer clay project using a layered cane technique
This project shows how to create a four-colour polymer clay cane that reveals repeating patterns when sliced. It’s a hands-on, pattern-based activity that encourages experimentation with colour, symmetry, and design.
While this is still suitable for young makers, it does require patience, careful handling, and adult supervision — especially when using blades and baking the clay.
Presented by: Crafty Corner
Skill level: Intermediate
Age suitability: 10+ with adult supervision
Supervision note: Sharp blade and oven use required; adults should handle cutting and baking
Materials and tools
- Polymer clay in four different colours
- Supplied by Amazon.co.za
- Pasta machine (strongly recommended)
- Metal pipe or rod
- Stanley knife blade or razor blade
- Damp cloth
- Sheet of glass or mirror to work on
- Household oven
Before starting, read through all the steps together. Work on a stable surface and keep blades under adult control at all times.
Step-by-step instructions
Step 1: Prepare the clay colours
Open each polymer clay packet and estimate how much you will need. Break off the amount required and seal the rest of the packet so it doesn’t harden.
Work each colour with your hands until it becomes soft and flexible. Roll each colour into a short log once softened.
Clean your hands with a damp cloth between colours to prevent colour transfer.

Step 2: Flatten the clay
Using a pasta machine, roll each colour through separately to create flat, even sheets of clay.
The pasta machine helps keep the thickness consistent, which is important for a clean pattern later on.

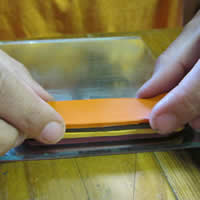
Step 3: Trim the sheets
Lay the four clay sheets onto your glass or mirror work surface. Using the full length of the blade (adult step), trim each strip so they are roughly the same size.
Do not trim the ends just yet.

Step 4: Stack the colours
Stack the clay sheets on top of each other, placing complementary colours together for stronger contrast.
Trim the ends so the stack forms a neat, even block. Colours that are too similar will not show the pattern clearly.

Step 5: Mark the sections
Using the blade, lightly mark the stack into four equal sections along its length before cutting.

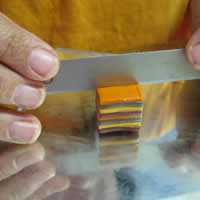
Step 6: Cut into blocks
Cut the clay stack into four equal blocks. At this stage, the pieces may remind you of Liquorice Allsorts.

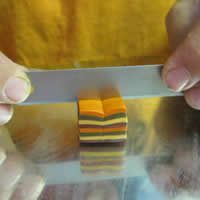
Step 7: Divide two blocks
Take one block and mark a cross on the top by lightly scoring it vertically and horizontally.
(Adult step) Cut the block in half, then turn and cut again in the opposite direction to create four smaller blocks.
Repeat this process with one more block so that you now have eight small blocks in total.
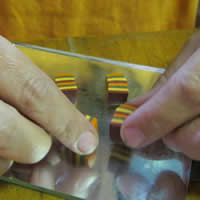
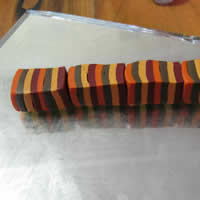
Step 8: Reassemble the blocks
Join the small blocks together end-to-end, keeping complementary colours touching.
Press gently so the pieces stick together without distorting the layers.
Step 9: Prepare the centre roll
For the centre of the cane, roll two new colours of polymer clay through the pasta machine to create two flat sheets.
Stack them together and trim off any excess to form a neat strip.
Step 10: Create the centre roll
Run two individual colours of polymer clay through the pasta machine to create two flat, even sheets.
Place one sheet on top of the other and trim away any excess so the edges line up neatly. Starting from one end, roll the stacked sheets into a short, squat roll.
You may need to trim the ends slightly. The finished roll should be roughly the same width as the block tower prepared earlier, as this roll will form the centre of the cane.

Step 11: Combine roll and tower
Wrap the long block tower around the rolled centre, bringing the ends together neatly.
If the tower is too short, slightly flatten the centre roll. If it’s too long, gently stretch the roll to fit.

Step 12
Now we need to join the roll and tower.
Take the long tower and place it around the two layer roll, making sure that the two ends of the tower meet comfortably around the roll. If the tower is too short, you need to decrease the width of your roll. If the tower is too long, you will need to flatten the roll a big more to stretch it out.
Step 13
Using your hands, shape and mould the two separate polymer clay pieces into one piece. The tower will easily stick to the roll. All you need to do is gently work them together.

Step 14
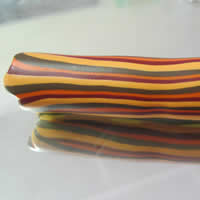
Once complete, you will begin to roll this out into a long, thin cane. You will do so by placing the roll on its side and working from the centre out towards the edges, rolling it slowly until it becomes longer. When you reach the width that you desire, stop rolling.
Step 15
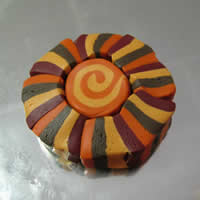
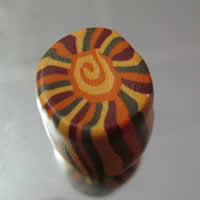
Cut the ends off of your long, thin polymer clay cane, they will be mis-shaped.
When you cut the cane, the best technique would be to hold your blade in both hands and roll the blade over the cane, moving left to right, allowing the cane to move with the blade, gently pushing down. This ensures the shape remains and the colours are a nice clean cut.
You can cut the cane as thickly or as thinly as you wish.
Step 16
You now need to leave your cut pieces of cane to dry overnight and then place in the oven the following day. Bake for 15min only, at approximately 140 degrees Celsius. The polymer clay will set very hard after baking.
Should you wish to make beads, we suggest making the hole after baking as this will inhibit you less when deciding which beads you need for a project. If you have a set beading project and you know where and how each bead will lay, then by all means make the holes while the polymer clay is still soft.
